Wildflower Long Course 2013 Race Report

The Wildflower Long Course is one of the most beautiful and one of the most difficult 70.3 half Ironman (HIM) distances around.  Not only is it hilly, it can also be very hot with windy conditions.  This particular weekend was epic.  We endured scorching temperatures of over 100F on some parts of the course on Saturday (the day of my long course race), and a chilly 62F on Sunday (the day of the Olympic course race).

I’ll begin my race report with a fun video documenting our race experience:

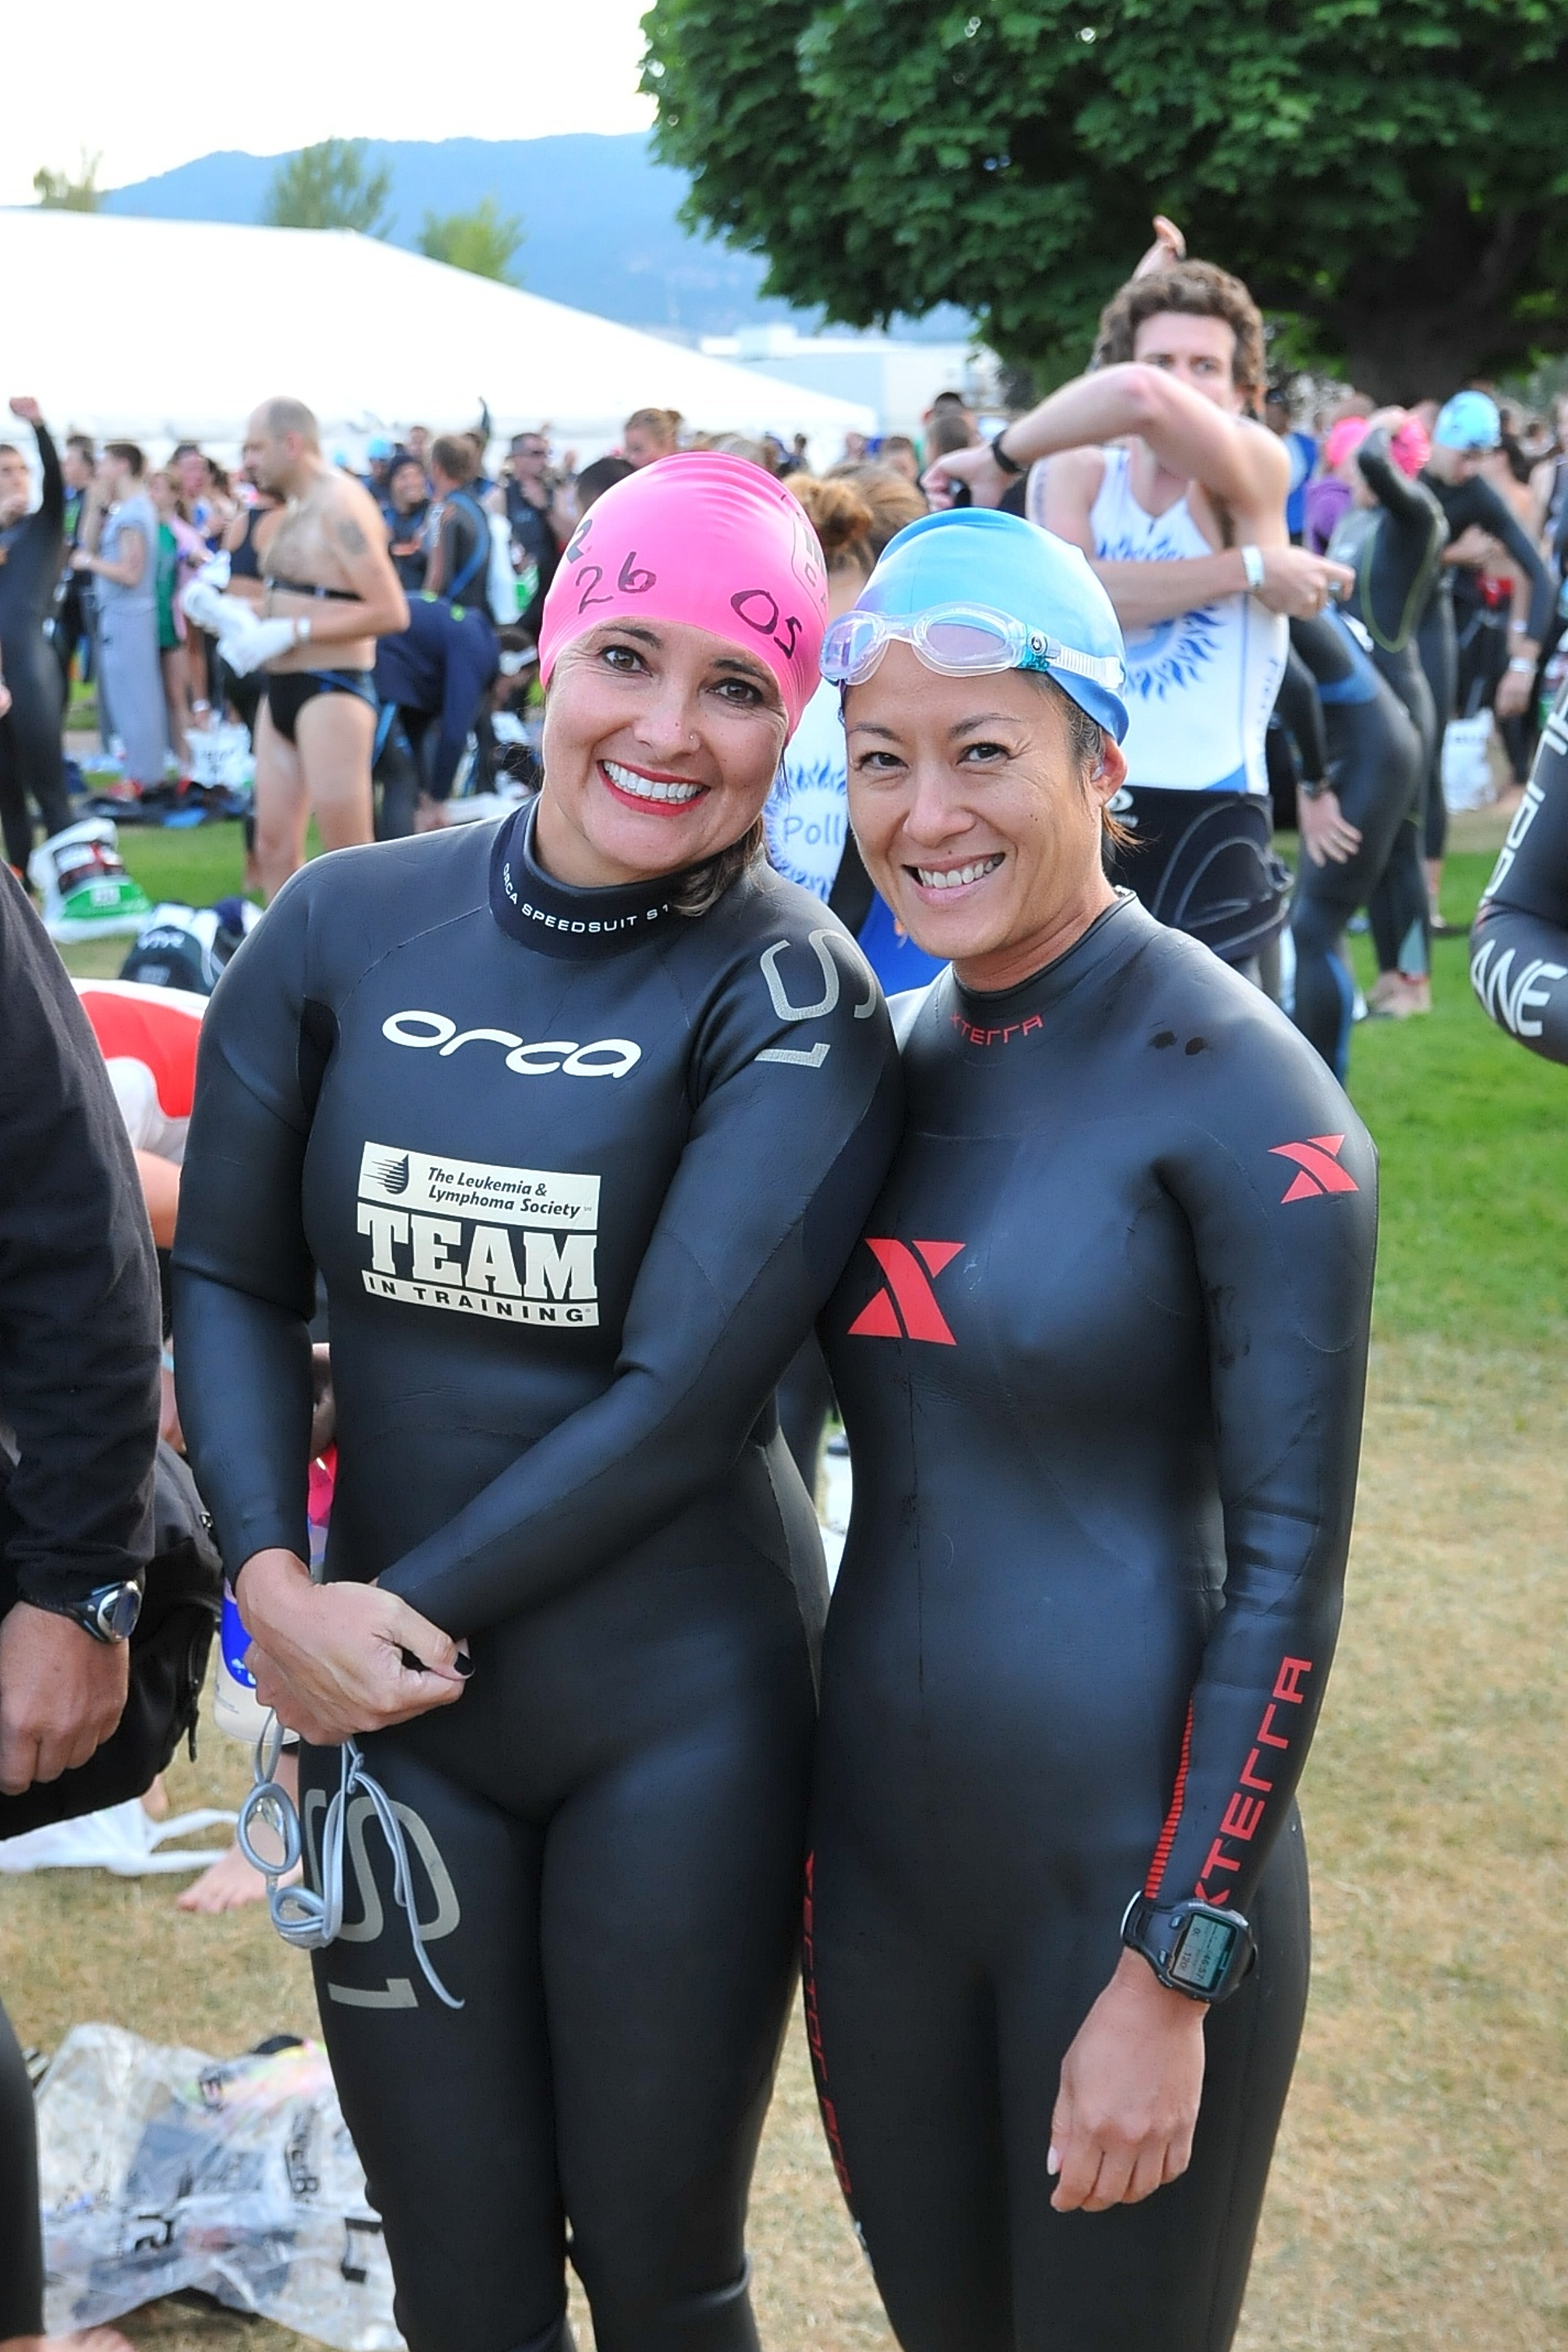
The Wildflower Long Course was my 1st race of the season.  This was my 2nd year at Wildflower.  I was more experienced, felt better prepared and am physically stronger.  I was hoping to PR (set a personal record) on this course, improving my previous time by 30 minutes, possibly more.  Regardless of my goal time, I was confident I’d have a positive race experience.

Swim

I was in the 2nd to last wave start.   That meant that I would be waiting around for quite awhile before I started my race.  I had to plan my nutrition to account for the gap in time between when I last ate breakfast until the time I am on the bike.  I brought a Greek yogurt and a bottle of Ensure to transition.  Both provided additional calories and protein.  I also drank Osmo preload to stay extra hydrated and prepared for sweating in the heat.

The water temperature was 70F.  I had a good practice open water swim a few days earlier and was the calmest I’ve ever been before the start of a swim.  I am also lucky to be starting in the same wave group with 3 of my dearest friends.  We gave each other a “good luck” hug and we are off.   One minute after the start of my swim, dad posted on my Facebook “It’s 9:26”.  It was like he was with me at the start line and watched me dive into the water.

My left goggle filled up with water almost right away. I could make out the big orange buoys and tolerated the water moving around in my left goggle for the entire swim.  I purposely swam more aggressively than in the past, focusing on my form all the way.  I even practiced bilateral breathing and breathing on my non-dominant side.

The relay team wave caught up to me quickly and they are at my feet, bumping to my left and right.  Fortunately, no one swam on top of me.  I tried to swim wide to avoid them.   At the end of my swim, I was able to stand up easily with no cramping.  Horray!

I thought for sure I had PR’d my swim however official race results showed it was actually one of the worst swim times I’ve ever posted.  My swim pace was 13 secs/100 yards slower than last year.  I swam 20 secs/100 yards faster at another open water swim 3 days prior.  Unfortunately I lost all my Garmin data so I do not have any data other than the official race results.  Perhaps swimming further away from the buoys to avoid the relay team swimmers contributed to a slower swim time.

Several of my friends had unusually slower swim times as well.  There were complaints that the distance was longer and the official timing was off by 5-10 minutes for  some of the swim waves.   Tri California, the organizers of this race acknowledged the timing issue however as of today, nothing specific was confirmed.

For now I’ll assume I swam a bit further than 1.2 miles.  I did swim wide to avoid the relay swimmers. I was happy I did not lose my contact.  I was very comfortable in the water and felt more efficient.  It was a good swim for me.

T1

For the first time, I am able to jog after a few steps out of the water to T1.  I reduced my prior year’s transition time by about 5 minutes!  My coach wanted me to reduce my T1 by half.  7:15 is far better than 12:19.
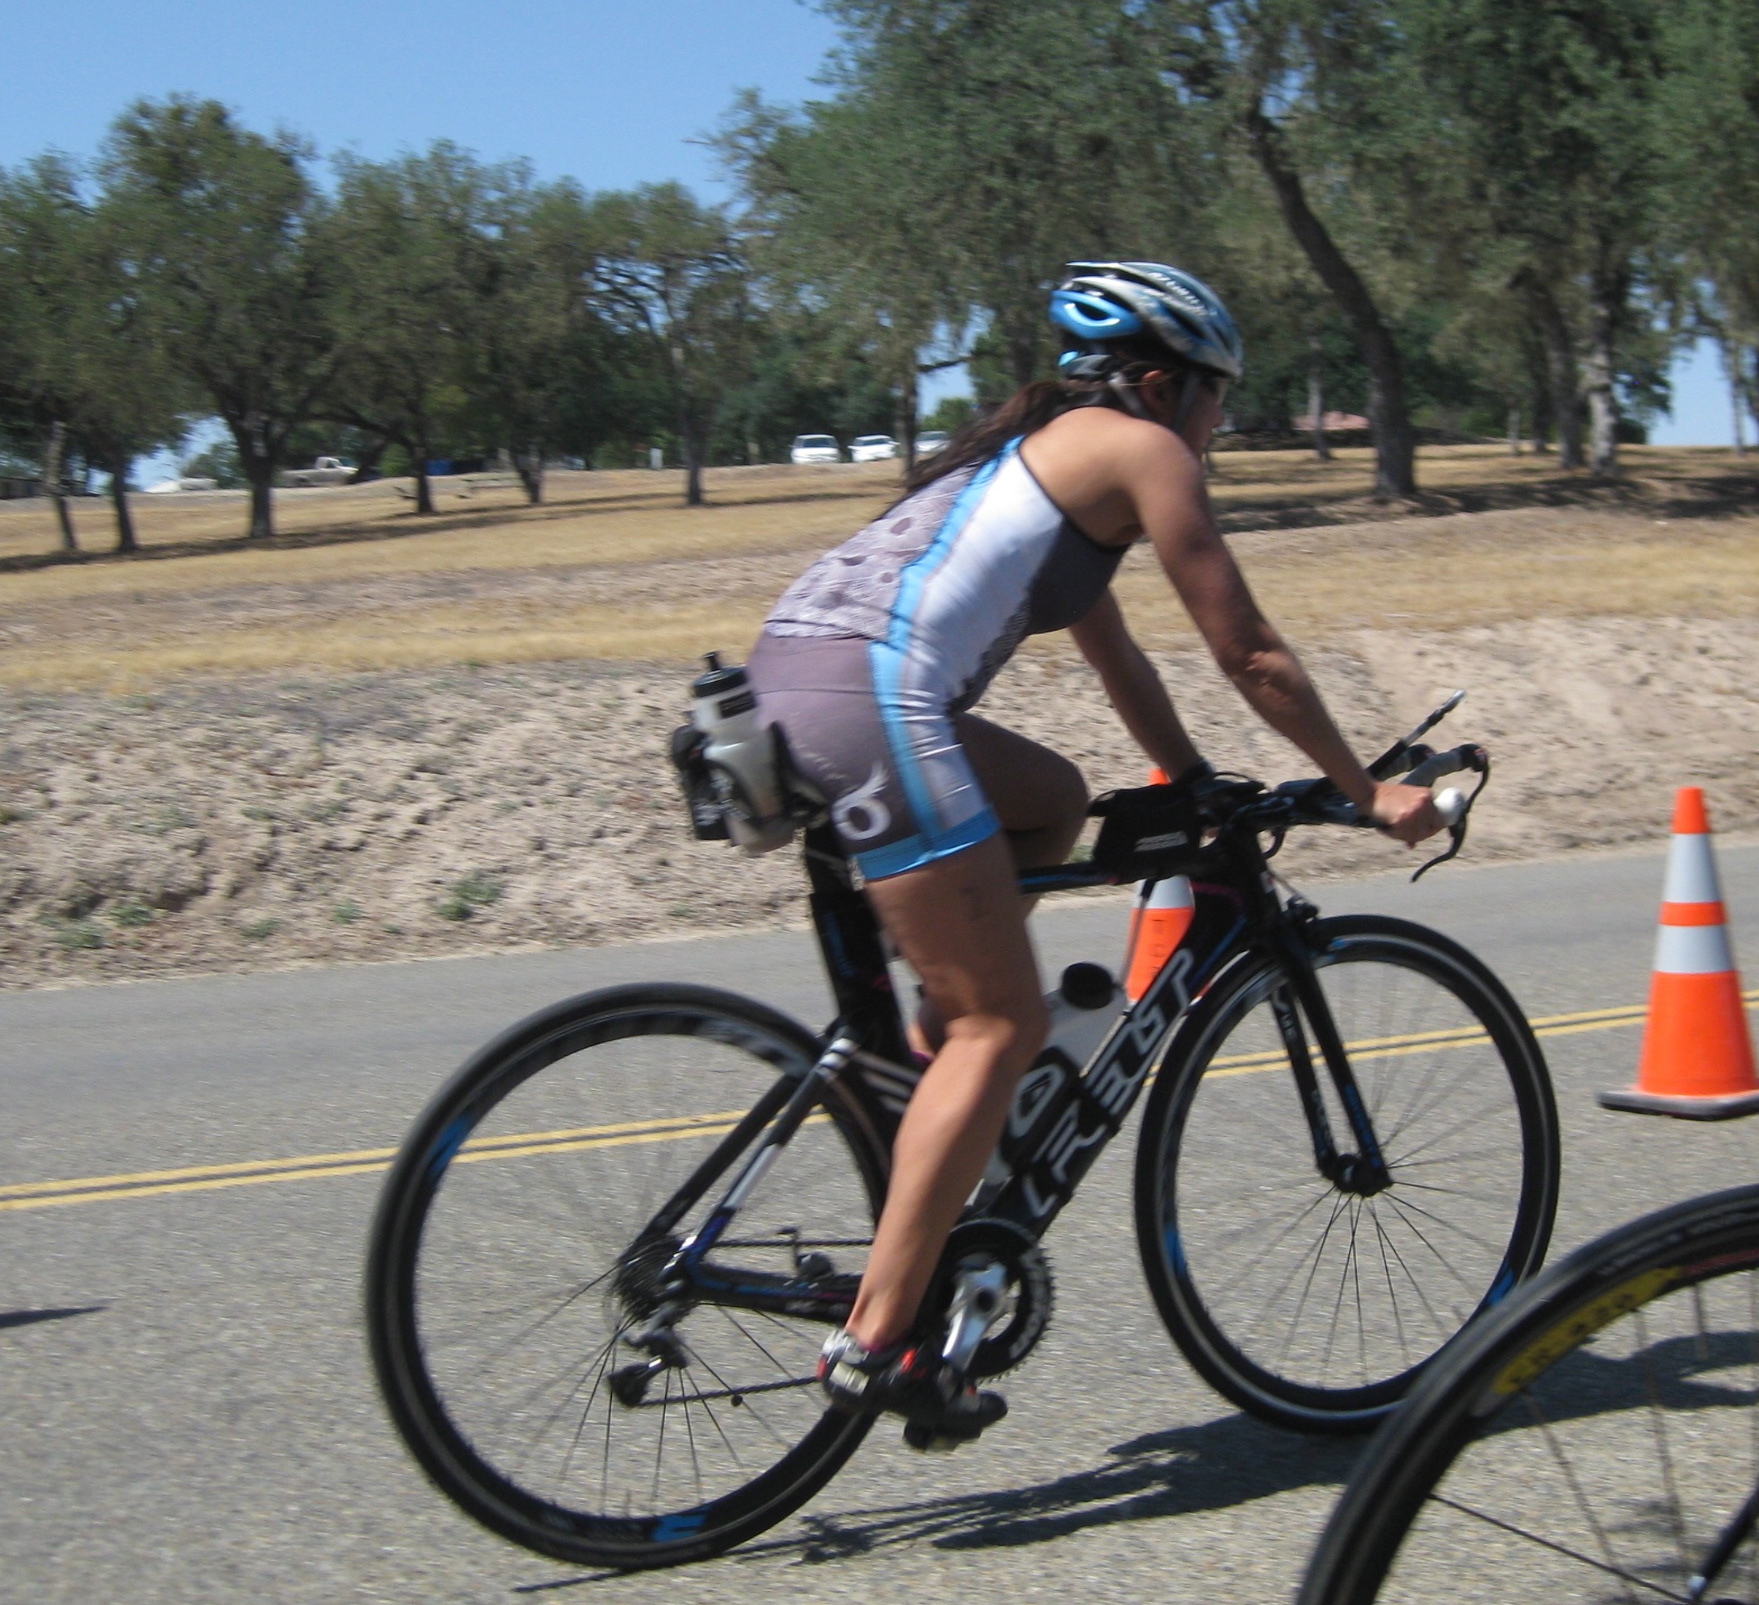
Bike

The Wildflower Long bike course is legendary with a section labeled on the official map as “Nasty Grade” at mile 41.5.

For 40 miles, I rode with good effort while continuing to keep my heart rate in check.  I am a stronger cyclist this year.  Three weeks prior, I easily rode with an average speed .7 mph faster on the entire course compared to the prior year.  I felt confident that on race day, with a little more effort, I’d achieve an average 1-1.5 mph faster than the prior year.  I was on target to achieve this.  I did feel a little sleepy.  Perhaps due to the heat?  I had caffeine in my Perpetuum which eventually perked me up.

courseprofile

The air temperature was anywhere from 93F-100F.  I was drinking water and taking in electrolytes diligently.  At mile 36 I grabbed 2 water bottles from the aid station and filled up my Speedfill.  I was consuming water at a very fast rate.  I learned later that the bottles I grabbed were most likely partially filled.  The race organization admitted to doing that however this was not their normal practice at earlier water stops or in previous years.  This aid station later ran out of bottles altogether.  A friend of mine had to turn around on her bike to retrieve the bottle she just tossed so she would have a bottle to fill water with.

I was out of water before the next aid station at mile 42.  I assumed I was drinking water at a very fast rate.  Now I wonder if partially filled bottles compounded the situation.

The aid station at mile 42 ran out of  drinkable water.  The water they had was undrinkable.  I didn’t understand what that meant but I was not about to drink water that was deemed “undrinkable”.  A volunteer offered to dump it on my head.   I accepted.  A volunteer told me they had contacted the race organizers twice about the water but no one knew if more water was on it’s way.  I started to feel a little worried.  I was quite thirsty.  I stretched my legs and tried to cool down.  I cautiously took a sip of my nutrition because I am unable to chase my protein and carbohydrates down with water .  Without water, I am unable to take any electrolytes.

I got back on my bike and climbed Nasty Grade as slow as possible to conserve energy.  As if having no water and 97F wasn’t bad enough, we had headwind climbing Nasty Grade.  Seriously?  My legs cramped up and I am feeling light headed.  My power and energy level dropped but I thought I was still going to make the bike cut-off time because I had “banked” some time with a faster bike pace prior to Nasty Grade.  I also thought I could make up some time on the fast descents coming up.    Unfortunately, there were strong crosswind gusts on the descents and I could not take the descents at over 40 mph like I normally do.  I was being blown around so much and had to take it slow.

Image 5

The last aid station at mile 47  had run out of water as well.  I am 9 miles from transition.  The most difficult part of the course are the rollers after Nasty Grade.   I decided to find a shade where I could get off my bike and I tried to cool my core temperature down one more time before I had to face those rollers.  After taking a few minutes to recharge, I got back on the saddle and tried to push a little more aggressively to finish. I felt a little demoralized, nauseas and had no energy but I shifted into my easiest gears and spun as fast as I could.  Unfortunately, it was not in time to make the cutoff.

For the waves/age groups who had no water at two aid stations, 26% of the women DNF’d.  In comparison, 8-11% of the men in the same age groups, who started the race earlier DNF’d.   The percentage of women in the same age groups who DNF’d in previous years is much lower.

T2

I was disappointed but stayed focused.  I racked my bike and put my running shoes on.  I thought I’d make the most of my experience there and attempted to run the course anyway.  All around me were a few disappointed ladies.  One lady looked at me and said “I normally don’t cry over races.”  I told her, “C’mon.  Put your running shoes on and come run with my anyway.”  I tried to catch up on my hydration and took extra electrolytes (Endurolytes/Salt Stick).  I wonder if I took water in too quickly.  I still felt nauseas.  I could not hold it in.  I was frustrated because I had no idea if I had too much electrolytes or too much water.  I learned recently that you can cramp up from too much salt too.

Run

After 7 miles, I started to feel too sick to continue.  I made a decision to run straight for the medical tent.

Takeaways

I asked the nutritionist who was teaching the nutrition for endurance athletes course at Stanford, what I could have done to recover from dehydration.  He told me, “go to the medical tent.”  I learned that sometimes if you are too dehydrated, you just need to stop and seek medical attention.  I felt worse at that moment than I did after Ironman Canada.

This experience was epic.   It was not a positive experience but a good experience.  I had a good swim, a good transition and a decent bike.  I was able to run for 7 miles.  Except for running out of water, I had my nutrition down.  I was able to ride a hilly course with my TT bike which was a boost of confidence for my upcoming Ironman Lake Tahoe which will have a lot more climbs.  Stopping to cool down for a few minutes did help me to recover a little but it is difficult to do it without water.

Tri California sent a personal note to myself and others with a sincere apology and some have received a complimentary entry for next year.

The takeaways from this experience are:

  1. Be more aware of how much water is handed to me.  Hopefully the race organizers will revisit their process and this will not be an issue in the future.
  2. There is a fine line between being tenacious and knowing when your health is in jeopardy.
  3. Thank all of the wonderful college students who volunteered to stand out in the heat all day.  At a couple of the run water stops, the volunteers cheered me on with so much enthusiasm.  I was surrounded by 10 college guys who gave me high 5’s and cheered for me as they dumped water on top of my head.  One of them told me they loved me.  It made my day.
  4. It’s ok to concede.  Weather, mechanical issues, illness and other factors out of your control can impact your race day.  It’s all good.  I am lucky to be able to do this.  I hope I’m healthy enough to return next year.
  5. I can survive racing in 100F.

Orange and Rosemary Roast Pork Tenderloin with Fennel and Sweet Potatoes

My Orange and Rosemary Roast Pork Tenderloin with Fennel and Sweet Potatoes is a protein-rich and nutritious meal, that is easy and quick to prepare for a weekday dinner but elegant enough to serve for Easter Sunday.

My inspiration were the sweet and juicy oranges I had in my Easter basket from my friends’ backyards.  The other inspiration is that I needed to prepare a healthy meal for my triathlete friend who came for dinner and brought me these lovely daffodils.

DSC_6338

According to WebMD, pork tenderloin is nutrient-rich and about 31% leaner than 20 years ago.  The pork tenderloin comes from the leanest part of the pig.  It has very little saturated fat and is as lean as chicken breast.  Because the pork tenderloin is lean, the meat can be dry if over-cooked.  To avoid over-cooking, use a meat thermometer.

The sweetness of the roasted fennel and sweet potatoes compliments the flavors of the marinated pork tenderloin.  I prepared this dish using both white and orange sweet potatoes.  I prefer the orange sweet potatoes because it adds a nice color to the dish, but they are hard to find in my local food markets.  Both white and orange sweet potatoes are “superfoods” rich in Vitamin A, Vitamin C, calcium and potassium.  The white sweet potato is a little sweeter and the orange sweet potato is known to contain more beta-carotene.  Yams are not the same as sweet potatoes and do not contain the same nutritional value.  The white sweet potato has a softer and lighter skin in comparison to the orange sweet potato, which has a darker skin and harder texture.

Serving size: 6

Marinade pork tenderloin overnight or for at least 4 hours.  When you are ready to cook the pork tenderloin, preheat oven or grill to 400F.

Ingredients:

  • 1 orange, zest grated
  • 1 ½ cups of freshly squeezed orange juice (about 3-4 oranges)
  • ¼ cup soy sauce
  • 1 ½ tablespoons of minced garlic (about 5 cloves)
  • 2 tablespoons minced fresh rosemary leaves (3 sprigs)
  • 1 tablespoon Dijon mustard
  • ½ teaspoon freshly ground black pepper
  • 1 ½ lbs pork tenderloin (3-4 ounces per person)
  • 6-7 tablespoons olive oil
  • 2 pounds of sweet potatoes
  • 2 fennel bulbs (reserving some of the fronds for garnish)
  • 2 teaspoons freshly ground black pepper
  • 1 teaspoon Kosher salt
  • ¼ cup of water

Directions:

Prepare the marinade by whisking together orange zest, orange juice, soy sauce, garlic, rosemary, Dijon mustard and ground black pepper.  Reserve ½ cup of the marinade and refrigerate.  You will use this to make a sauce for the tenderloin later.

Place remaining marinade and the pork tenderloin in a large leakproof and resealable bag.  Marinade overnight or for at least 3 hours.

Remove the tenderloins from the marinade and discard the marinade.  Leave the herbs that cling to the meat. Sprinkle the tenderloins with freshly ground black pepper.  Set aside.

Peel and cut sweet potatoes into 1 inch cubes.  Cut fennel bulbs across in half then lengthwise into 1 inch quarters.  Separate the layers.  Toss the potatoes and fennel in 4 tablespoons olive oil.  Season with salt and pepper.  Place in large roasting pan.  Roast for 25 minutes, tossing a couple times, until potatoes and fennel slightly brown and caramelized.

DSC_6339

Heat 2-3 tablespoons olive oil in a large sauté pan over medium-high heat. Sear the pork tenderloins on all sides until golden brown about 3 minutes on each side.  Push the vegetables to the edges to make room for the pork tenderloin, but it is fine if the tenderloin lays on top of some of it.  Roast the tenderloins for 10 to 15 minutes or until the meat registers 145F* at the thickest part.

If necessary, the vegetables can be left to roast a few minutes longer once the pork tenderloin is removed.

Heat reserved marinade with water in sauce pan.  Bring to a boil then simmer for about 10 minutes until reduced slightly.

Transfer the tenderloins to a platter and cover tightly with aluminum foil.  Allow to rest for 10 minutes. Carve in 1/2-inch-thick diagonal slices. The tenderloin will be a little pink, which I prefer.  Serve on top of fennel and sweet potatoes.  Spoon strained sauce over sliced pork.  Garnish pork with fennel fronds (leaves).

* Note: The USDA recommends cooking the pork tenderloin to an internal temperature of 145F.  At this temperature, the pork tenderloin may be a little pink in the thickest part, which is completely fine.

Fronds are the leaves.
Allow the pork tenderloin to rest covered with aluminum foil for 10 minutes before slicing.  The ends will be well done and the middle will be a little pink.
Allow the pork tenderloin to rest covered with aluminum foil for 10 minutes before slicing. The ends will be well done and the middle will be a little pink.
Served with white sweet potatoes here.

References:

http://www.webmd.com/fitness-exercise/guide/good-protein-sources

http://www.fsis.usda.gov/news/NR_052411_01/index.asp

http://www.webmd.com/food-recipes/features/10-everyday-super-foods?page=2

http://www.differencebetween.net/object/comparisons-of-food-items/difference-between-white-and-orange-sweet-potato/#ixzz2PGQhyRIp

http://www.porkbeinspired.com/NutritionalInfo_ComparePork.aspx

Orange, Fennel and Arugula Salad

Oranges are a wonderful winter fruit that is in season right now.  Several of my friends and neighbors here in Northern California have more oranges growing in their backyard than they know what to do with.

Here’s a refreshing and healthy recipe that will give you a reason to use up those oranges.  My Orange, Fennel and Arugula Salad is a burst of flavor with every bite.  The sweetness from the oranges, hint of licorice from the fennel and the peppery notes from the arugula, compliment each other well.

Did you know that oranges and fennel are a good source of vitamin C and calcium?  In addition, fennel has many health benefits.  It is a good source of fiber, potassium, folate, niacin as well as minerals, such as phosphorus, calcium, magnesium, iron and copper.  In animal studies, the anethole in fennel has been shown to reduce inflammation and to help prevent the occurrence of cancer.

Serving size: 2

Equipment: Mandoline (but not required)

Ingredients:

  • 1 medium fennel bulb, sliced thinly with a Mandoline (about 1 cup)
  • 3 large or 4 small oranges
  • 1 large lemon
  • 1 tablespoon extra virgin olive oil
  • ½ teaspoon ground cardamom
  • ½ teaspoon salt
  • ¼ freshly cracked pepper (about 5 turns of the pepper mill)
  • 2 teaspoons honey
  • 6 cups arugula

Directions

Using a mandolin set at the thinnest setting, or with a knife, slice the fennel bulb.  Set aside.

Cut the skin off of the oranges and then slice the oranges into ¼ inch cross sections.

DSC_6294

In a small mixing bowl, make the salad vinaigrette by whisking together the juice of 1 lemon, olive oil, ground cardamom, salt, freshly cracked pepper and honey.

I a small bowl, toss fennel in 1 tablespoon of the vinaigrette.  In a separate bowl, toss the arugula in 1 tablespoon of the vinaigrette.

On a serving plate, make a bed of arugula.  Arrange orange slices on top of the arugula.  Sprinkle fennel over orange slices.  Spoon remaining vinaigrette over oranges. Garnish with the chopped fennel fronds (leaves).  Top with freshly cracked pepper.

IMG_2291

For a dinner party, I used mixed greens instead of arugula.  This salad pairs well with a lot of dishes.


Pasta with Fresh Spinach and Tomatoes

My Pasta with Fresh Spinach and Tomatoes was inspired by my dear friend Kelly.   A cancer survivor, mom and 8 time Ironman triathlete, Kelly was a big inspiration at my most significant races: my first triathlon and my first Ironman triathlon.

I had butterflies in my stomach at these two races.  My mind was racing and rethinking everything (Do I have all my nutrition?  How much time do I have before my wave starts?  Did I lay out everything I need in transition?)  At my first triathlon, I spotted Kelly, laying on her back on the beach, in her wetsuit, with her legs crossed and her eyes closed.  She looked so peaceful.   I’ve got to learn how to relax like that before the start of a race!

295917_10150312075499757_1466433818_n

When it was time for us to start the race, Kelly offered to swim with me.  You see, Kelly races for the pure enjoyment of racing.  Of course I declined.  I wanted her to race her own race, but I will always remember her selfless gesture.

At my first Ironman, I was lucky to find Kelly before the start again.   She was my security blanket as we walked out to the beach.  Kelly then looked into my eyes and reminded me that “It’s just another training day.”   Exactly what I needed to hear.

This recipe is for Kelly.  She asked for spinach and tomatoes with her pasta.

Serving size: 2

Ingredients:

  • 1 cup whole wheat or gluten-free pasta* (cooked al dente)
  • 4 tablespoons olive oil
  • 2 large cloves garlic, minced
  • 2 plum tomatoes, largely diced (about 3/4 inch)
  • 6 cups of baby spinach leaves
  • ¼ teaspoon red pepper flakes
  • a couple pinches of salt
  • a couple grinds freshly cracked black pepper
  • ½ lemon
  • ½ cup grated Parmesan or Pecorino cheese (optional)

* Note: Nutritionists recommend a single serving size of pasta be no more than ½ cup or the size of a hockey puck.  This is much less than what is typically served at restaurants.  I simply add lots of vegetables to my 1/2 cup of pasta.  In addition, I eat a side salad with this meal.  My Orange, Fennel and Arugula Salad or a simple tossed salad pairs nicely with this dish.

Directions:

Cook the pasta al dente according to the instructions on the package.

While the pasta is cooking, heat olive oil in sauté pan over medium heat.  Sauté  garlic in the olive oil for about a minute, then add spinach leaves and tomatoes.  Continue to sauté until the spinach wilts and the tomatoes starts to break down a little.  Season with red pepper flakes, salt and freshly cracked black pepper.  Add juice of half of a lemon and toss to combine.  Add to cooked pasta.

The pasta is flavorful as is however, grated Parmesan or Pecorino cheese can be added just before serving.

DSC_6310

kellypimimcswim
Kelly and I, just before we walked onto the beach at Ironman Canada.

Broccoli and Mushroom Pasta with Red Pepper Flakes

A couple of my Ironman training partners are on a vegan diet.  Both maintain a busy schedule working full-time while training 6 days a week.  This doesn’t leave much time to prepare healthy vegan meals.  One hired a nutritionist to cook meals for her while the other is a single bachelor.  I created My Broccoli and Mushroom Pasta with Red Pepper Flakes for them.  It’s a healthy, carbo-loaded recipe that is quick and easy to prepare.

A single serving of this dish contains a cup of broccoli, one of the super-foods.  Broccoli is low in calories and rich in nutrients including protein.  Broccoli also contains the highest levels of certain glucosinolates, which scientists believe may reduce the risk of certain cancers.

The broccoli is cooked for only a couple minutes.  Experts recommend that broccoli be cooked for only 2-3 minutes and remain crunchy in order to retain its health benefits.

For more information on broccoli, check out this article:

http://www.sciencedaily.com/releases/2011/10/111011112501.htm

 Serving size: 2

 Ingredients:

  • 1 small garlic clove or ½ large garlic clove
  • 1 cup of cooked whole wheat pasta (or gluten-free pasta)
  • 2 cups chopped broccoli florets
  • 2 cups sliced mushrooms
  • ½ cup + 3 tablespoon extra-virgin olive oil
  • ½ teaspoon red chili pepper flakes, plus more if desired
  • ½ cup pasta water
  • ¼ cup Parmigiano Reggiano cheese freshly grated (optional and may be omitted for a non-dairy diet)

Directions:

Preheat oven to 400F.

Slice off enough of the top of the garlic clove to expose the cloves.  Drizzle with 1 tablespoon of olive oil and wrap in aluminum foil.  Roast for 25 minutes.

While the garlic is roasting, bring 6 quarts of water to a boil. Add salt to the water and then add pasta.  Cook until al dente, about 6 to 8 minutes. Drain pasta in a colander, reserving ½ cup of the pasta water.  Uncooked spaghetti, about the diameter of a quarter when held together between your thumb and index finger, should yield about a cup of cooked spaghetti.

In small sauté pan, sauté mushrooms in 2 tablespoon of olive oil over medium heat.  Saute for about 5 minutes until mushrooms are lightly brown.  Season with a pinch of salt and freshly cracked peppercorns.

DSC_6278

Boil or steam broccoli for 1 minute.  Discard the water in the pot used to boil or steam the broccoli.  Return cooked broccoli to the empty pot.

Once the garlic is roasted, peel each garlic clove by removing the outer most cloves first.  Then cut the tip of the skin off the top of each clove.  The roasted garlic clove should now be easy to remove.

DSC_6280

Course chop the garlic gloves and add to the broccoli.  Then add mushrooms, red chili pepper flakes and olive oil.  Saute over medium heat, for approximately 1 minute, mashing the garlic into the broccoli and mushrooms.

DSC_6282

Add the pasta and reserved pasta water.  Season with salt and freshly cracked peppercorns and toss for 1 more minute.

Place in individual serving bowls and add grated Parmigiano Reggiano cheese before serving.  Sprinkling a pinch of red chili pepper flakes on top makes a nice presentation.

DSC_6287

Chocolate Cinnamon Mousse

Two physicians inspired this recipe.  One is my father, a retired pediatrician, who taught me how to live a healthy life by learning how to love eating delicious, healthy foods and learning how to enjoy physical activity through the love of sports.  Dad was also in love with chocolate mousse.  My father spent many years trying to perfect his chocolate mousse recipe.  The other inspiration came from a friend of mine who made me aware of the health benefits of cinnamon.  He also loves dark chocolate and has been known to enjoy licking a bowl of chocolate batter.

While the lab results are mixed, some research has found that cinnamon, may reduce inflammation, have antioxidant effects, fight bacteria and may lower blood sugar in people with diabetes.  For more information on cinnamon, check out this article:

http://www.webmd.com/vitamins-and-supplements/lifestyle-guide-11/supplement-guide-cinnamon

This healthy chocolate dessert has a surprise ingredient.  Trust me.  You won’t be able to tell what it is when you eat this chocolate mousse, but read on.  You’ll quickly figure out what the surprise is.

Serving size: 6

Ingredients:

  • 11.5 oz. good quality dark chocolate chips (The Hungry Athlete prefers dark chocolate but semisweet chocolate chips maybe substituted)
  • 1 ½ teaspoon ground cinnamon
  • 1 large, ripe Bacon avocado*, pitted and peeled
  • ½ teaspoon vanilla extract*
  • 3 tablespoon agave syrup*
  • pinch of salt
  • 6 egg whites**
  • ½ teaspoon lemon
  • 6 strawberries for garnish

* NOTE: I used Bacon avocado because it has a mild flavor but a Haas avocado can be substituted.  In addition, if you are on a gluten-free diet, ensure that the ingredients you are using are gluten-free.

** NOTE:  If you have concerns using raw eggs, which can carry salmonella, use pasteurized egg whites which are available in supermarkets.  Make sure the label states that it is pasteurized.  Pasteurized egg whites may require more time to whip.  Adding lemon juice (an acid) will help the pasteurized egg whites to whip up.  I personally enjoy many recipes using raw or undercooked eggs such as eggs sunny side up, soft poached eggs, holladaise sauce, meringues and Caesar salad.

Directions:

Melt the chocolate with the cinnamon in a double boiler over hot water and set aside.

DSC_6243

Purée the avocado in a food processor until smooth.   Add vanilla extract, agave syrup and salt and continue to puree until combined.

DSC_6238

DSC_6242

With the machine running, pour in the chocolate mixture.  The easiest way to do this is to transfer the chocolate mixture to a measuring cup first and then pour the chocolate mixture from the measuring cup.

Using a stand mixer or whisk, beat the egg whites until they begin to form soft peaks.  Add the lemon juice and continue to beat until soft peaks form.

DSC_6245

Fold the chocolate mixture into the egg whites.

Fold in portions of the chocolate mixture at a time.  Take your time to continue to fold until the chocolate is fully incorporated.  Resist the urge to stir.  You want to maintain the airy lightness of the egg whites.
Fold in portions of the chocolate mixture a big spatula full at a time. Take your time to continue to fold until the chocolate is fully incorporated. Resist the urge to stir. You want to maintain the airy lightness of the egg whites.

Pour the mousse into 6 small serving bowls, juice cups or wineglasses and refrigerate for at least 1 hour, or covered with plastic wrap overnight.  Garnish with strawberries.

DSC_6248

DSC_6252

Salmon Nicoise Salad for Two

This attractive salad is packed with a lot of heart healthy ingredients and requires very little cooking time.   Salmon and sardines are high in omega-3 fatty acids, which research shows can boost heart health, lower triglycerides and may help with rheumatoid arthritis and depression.  Olives and olive oil can help lower LDL “bad” cholesterol, maintain levels of HDL “good” cholesterol and protect against heart disease.  Avocados are also heart-healthy, a good source of fiber, potassium and vitamins C, K, folate and B6.

This salad is very easy to prepare and the ingredients can be exchanged depending on what you are in the mood for.  Any variety of tomatoes can be used.  The avocado can be replaced with blanched string beans.   For more complex carbohydrates, small boiled potatoes can be added.

Serving size: 2

Ingredients:

  • 10 ounces Salmon (I prefer wild sockeye salmon)
  • 1 tablespoon Dijon mustard*
  • 2 tablespoon soy sauce*
  • ¼ cup plus 2 tablespoon olive oil
  • 1 ripe avocado, sliced and fanned
  • skinless and boneless smoked sardines*
  • sliced heirloom tomatoes, or grape tomatoes cut in half or cherry tomatoes cut in half
  • balsamic vinegar*
  • Kosher salt
  • Freshly cracked pepper
  • 2 boiled eggs, sliced
  • lettuce or kale
  • 1 cup olives
  • roasted red peppers (optional)
  • green beans, blanched (optional)
  • boiled baby potatoes cut in half (optional)

* NOTE: If you are a gluten-free diet, ensure that the ingredients you are using are gluten-free.

Directions:

 Preheat oven’s broiler.

Whisk together Dijon mustard, soy sauce and 2 tablespoons of olive oil.  Pour over salmon and marinade for 10-30 minutes.

DSC_6203

Boil eggs.  I prefer soft boiled which I achieve by placing the eggs in a pot of water, then bring the water to boil.  Allow the eggs to sit in the boiling water for 2 minutes, then turn off the heat, cover the eggs and allow to sit for 3 more minutes.  Rinse the eggs in cool water and then place them back into the pot with cold water.

Line a jelly roll pan with aluminum foil, and spray with nonstick spray.  Crack fresh pepper over salmon and place salmon skin side down Broil the salmon in the pan, skin side down, for 8-10 minutes.

DSC_6207

DSC_6214

The salmon skin should be easy to remove and recommend you do this before plating.  Prepare the salad dressing by whisking together balsamic vinegar, ¼ cup of olive oil with a pinch of Kosher salt.  Arrange all ingredients on a plate and drizzle ablout 2-3 teaspoon of salad dressing over lettuce, tomatoes and other vegetables.  Take care to arrange your plate.  We eat with our eyes first, so presentation is key.

DSC_6211

We eat with our eyes and taste with our nose too.  When entertaining, I always take a moment to think about presentation.
We eat with our eyes and taste with our nose too. When entertaining, I always take a moment to think about presentation.
DSC_5117
Nicoise Salad with heirloom tomatoes, string beans, butter lettuce, olives and sardines.
Salmon nicoise salad with cherry tomatoes, string beans, sardines, olives and soft boiled eggs.
Salmon nicoise salad with cherry tomatoes, string beans, sardines, olives, avocado and soft boiled eggs.
Nicoise salad with kale, avocado, cherry tomatoes, sardines, eggs and olives.  Doesn't get much healthier than this!
Nicoise salad with kale, avocado, cherry tomatoes, sardines, eggs and olives.  It doesn’t get much healthier than this!

Pear and Goat Cheese Pizza with Caramelized Onions

I am the social athlete.  I never turn down an opportunity to have a meal with my fellow athlete friends.  Last week I had the pleasure of dining with 4 other fellow female Ironman triathletes, two were racing a 50K marathon in the next 48 hours and I was racing a half marathon in the next 72 hours.  Our carbo-loading meal was a fabulous Pear and Goat Cheese Pizza.  It was so good, I was still thinking about it this week and decided to make it.

Since I’m the busy every day athlete, with competing fulltime responsibilities like everyone else, I take cooking shortcuts every chance I get.  The big time saver for this recipe is buying the pizza dough.  These days you can find a variety of pizza dough in your local supermarket’s freezer.  I decided to buy whole wheat dough, but you can also use multi-grain or traditional pizza dough.

Here’s nutritional information for whole wheat pizza dough:

http://healthyeating.sfgate.com/nutrients-whole-wheat-pizza-dough-3626.html

NOTE:  I originally made candied walnuts to add to the pizza (in the photos), however the caramelized onions added enough sweetness.  I ended up picking the walnuts off and enjoying them separately.  Next time, I’ll use plain toasted walnuts for some crunch without the added sugar.  Nuts, including almonds, walnuts, and pecans, have been shown to have heart healthy benefits, including lowering “bad” LDL cholesterol.  Walnuts are also a source of omega-3.

Ingredients:

  • pizza dough*
  • 1 cup of thinly sliced onion
  • ¼ cup olive oil
  • Kosher salt
  • freshly cracked peppercorns
  • corn meal
  • 6 ounces of crumbled goat cheese*
  • juice of 1/2 lemon
  • 2 ripe pears, thinly sliced (depending on the size of the pear, you may only need 1 1/2)
  • arugula
  • 1/3 cup toasted walnuts (optional)

* NOTE: If you are a gluten-free diet, ensure that the ingredients you are using are gluten-free.

Directions:

Preheat over to 450F.

Follow the instructions for the pizza dough.  Usually the dough, if frozen, will need to  defrost over several hours and then allowed to sit a few more hours in a bowl, greased with olive oil, until the dough doubles in size.

DSC_6166

Cook onions covered in pan over medium/low heat with 2 tablespoons of olive oil and a pinch of salt and pepper.  Cook for about 15 minutes until soft and caramelized.  You may need to remove the lid to allow all of the liquid to evaporate towards the end of the cooking time.  Allow to cool.

The caramelized onions will be very sweet so a little bit added to the pizza will go a long way.

Prepare pizza dough and place on pizza stone or baking pan dusted with corn meal.  Bake pizza dough for about 10 minutes.  Remove from oven and top pizza with goat cheese and bake for 10 additional minutes or until cheese is starting to melt.

Whisk together remaining 2 tablespoons of olive oil, juice of 1/2 lemon and salt.  Toss arugula and in olive oil and lemon dressing.

Remove pizza from oven and top with pears, caramelized onions and arugula.  Season with freshly cracked pepper.  For some extra crunch, top with some plain toasted walnuts.

DSC_6181


IMG_0618

Quinoa with Turmeric, Peppers, Onions and Broccoli

My Quinoa with Turmeric, Peppers, Onions and Broccoli is a quick and easy meal to prepare and eat post workout, or anytime.

After a race or intense workout, I do 2 things to help my body recover : 1) restore glycogen and 2) reduce the inflammation.  I do this by eating protein with carbohydrates and taking an ice bath.  I sometimes have difficulty eating right after an intense workout either because my appetite is suppressed or the food/protein drinks available are unappealing.  I also don’t look forward to sitting in an ice bath, although appreciate how much better I feel after.

And then I learned from my coach and a doctor friend that turmeric is a natural anti-inflammatory. Turmeric, a relative of ginger, is a major ingredient in Indian curries and makes American mustard yellow. This spice is also a disease-preventive agent and powerful antioxidant. Check out this WebMD article about turmeric:

http://blogs.webmd.com/food-and-nutrition/2012/10/turmeric.html

Add turmeric to protein, such as quinoa, and you have an ideal post work-out “recovery”meal.  While turmeric may not replace my ice baths, it could potentially help in my recovery.

Ingredients:

  • 1 teaspoon olive oil
  • 1 cup finely medium onion chopped (about 1/2 medium onion)
  • 1 cup quinoa, rinsed well
  • 1 finely chopped red bell pepper
  • 2 cups vegetable broth
  • ½ teaspoon ground cumin
  • ½ teaspoon corriander
  • ½ teaspoon white pepper
  • ¼ teaspoon turmeric
  • ½ teaspoon kosher salt to taste
  • juice of half a lime
  • 1 cup chopped broccoli
  • ½ cup toasted pine nuts

Directions:

Heat olive oil in medium saucepan and sauté onions until translucent, about 5 minutes.  Add peppers and quinoa.  Saute until quinoa is lightly toasted.  Add vegetable broth, cumin, coriander, white pepper, turmeric and kosher salt.  Stir together, then add broccoli and bring to a boil.  Cover and simmer for about 12-15 minutes until broth is absorbed and quinoa is tender.  Turn off heat and allow to sit for an additional 15 minutes covered.  Fluff up quinoa and add lime juice and pine nuts.  Serve warm or at room temperature.

Fresh and nutritious ingredients makes this a healthy meal.
Chop broccoli into small pieces.
Toast pine nuts over medium heat.  Toss frequently and don't leave them alone.  They burn very easily.
Toast pine nuts over medium heat. Toss frequently and don’t leave them alone. They burn very easily.

DSC_6163

Spicy Roasted Chickpeas

Chickpeas or garbanzo beans are a good source of protein and fiber.  Roasting the chickpeas and tossing them in spices and honey transforms them into tasty, crunchy and healthy snacks.  They key is to bake them long enough to get a nice crunch without burning the honey coating.  If you prepare them without honey, you can bake them at a higher temperature (400F – 425F).  I prefer the salty, sweet and spicy combination and found that if you bake them “naked” for 30 minutes, then lower the temperature, you can achieve crunchy texture without burning the chickpeas.  There are many possible spice combinations.   Here are 2 recipes:

Preheat oven to 375F

Spicy Cumin & Paprika

  • 2 – 15 ounce cooked garbanzo beans (chickpeas) rinsed and dried
  • 2 teaspoons olive oil
  • 2 tablespoons honey
  • 1 tablespoons Worcestershire sauce
  • 1 teaspoon kosher salt
  • ½ teaspoon cayenne powder
  • ½ teaspoon paprika
  • ½ teaspoon cumin

Sweet & Spicy Rosemary

  • 2 – 15 ounce cooked garbanzo beans (chick peas) rinsed and dried
  • 2 teaspoons olive oil
  • 3 tablespoons honey
  • 1 1/2 teaspoon kosher salt
  • 1 tablespoon finely chopped fresh rosemary
  • ½ teaspoon cayenne powder

Rinse and drain chickpeas and spread on paper towels.  Remove any loose skin.  With another paper towel, pat to dry and air dry for 1 additional hour.  Chickpeas should be dry before baking.

DSC_6054

Line baking sheet with aluminum foil and bake chickpeas for 30 minutes, turning after 15 minutes.

DSC_6070

In medium mixing bowl, mix all remaining ingredients.

DSC_6074

Add hot chickpeas to bowl and coat evenly. Lower the oven temperature to 325F.  Return chickpeas to aluminum lined baking sheet and bake for additional 60 minutes, turning every 15 minutes.  The chickpeas are done when they are firm and crunchy which may require more or less baking time.  Allow to cool and enjoy.

DSC_6077