Steamed Whole Fish with Ginger and Black Bean Sauce

Happy Lunar New Year! I celebrated my Thai, Chinese and Vietnamese heritage with a customary whole steamed fish whose head and tail was kept intact, even when served. While dining, the dish is presented with the head of the fish directed at the guest of honor. The flesh is removed and served at the table without disturbing he head or tail. At the end of the meal, you are left with an impressive fish skeleton. It’s almost like a cartoon, where a character puts a whole fish in the mouth, head first, then and pulls out only the bones.

This dish is ridiculously easy to cook and done in 8-10 minutes depending on the size of the fish. Steaming also allows for a margin for error. You are almost guaranteed a moist and flaky fish even if you overcook it. I unintentionally tested this out. I do recommend not overcooking the fish.

This is a Chinese style recipe. The Thai style uses fish sauce in place of soy sauce, lime juice and palm sugar instead of rice wine, adds lemongrass, and of course, a generous amount of Thai bird chili peppers. Although there are a few different ways to prepare the Chinese style, there are typically only 3 basic ingredients (other than the fish itself): fresh ginger, scallion (green onion) and a salty sweetish sauce made of either fermented black bean paste, soy sauce with sugar, hoisin sauce, oyster sauce or some other similar sauce that is salty and slightly sweet.

I selected a combination of light soy sauce and fermented black bean paste as the base for my sauce. Since the black bean paste I used was already sweetened with brown sugar and pineapple juice, I did not add any additional sugar. As we all know, sugar is not good for us and unless it is imperative to what I’m cooking, I avoid adding it. To add a bit more tang, I included a Thai bird chili pepper with the seeds removed for a gentle heat along with white pepper, garlic and rice wine.

Some recipes do not include pouring hot oil over the fish as the final step. I included this step because the hot oil infuses the fish with the flavors of the herbs and spices laid on top of the fish. Some recipes have a larger quantity of sauce poured over the fish. My version offers a smaller amount of sauce poured around the fish. This way, you can enjoy the delicate flavor of the fish with some sauce on the side to compliment it. For me the star of this dish is the delicate fish, infused with ginger, scallions, coriander (cilantro) and a hint of Thai bird chili pepper. The co-star is the black bean sauce.

NOTES:
Any mild whole white fish can be used. A flatter fish steams better. For this recipe, I found a nice barramundi, also called Asian sea bass. Take a moment to inspect the fish before you purchase it. Fresh fish should not smell too fishy. Also, the skin, should be shiny, the flesh should be firm, the gills should be red and the eyes should appear clear. Ask your fish monger to scale and gut the fish.

** Fermented black bean paste is made of dried soybeans that have been fermented with salt and spices such as chili peppers and/or wine and possibly ginger. The brand I used is made with ginger, pineapple juice and tamari. You could use just the fermented black beans, (called Douchi) and take a few additional, but simple steps to rinse the beans, then make your own paste by mashing them with garlic, spices and a little brown sugar or pineapple juice.

*** Chinese rice wine or Shaoxing is not the same as rice wine vinegar so be careful when reading the label. The Japanese rice wine is called mirin and is sweeter. 

Serving size: 2

Ingredients:

  • 1 pound whole mild white fish*, scaled and gutted, (barramundi, striped bass, flounder, red snapper or branzino), scaled and gutted. (If using a larger whole fish, score** both sides of the fish.)
  • 3 inch nub of ginger, 1/3 julienned and 2/3 cut into large  ¼ inch thick slices (you do not need to remove the skin off of the piece that is julienned)
  • 5 stalks of scallion (green onion), 1/3 julienned and 2/3 cut into 2 inch pieces
  • 1 – 2 fresh Thai bird chili pepper, julienned (this can be omitted or the seeds can be removed for a milder taste)
  • 1 small clove garlic, minced
  • 1 tablespoon fermented black bean paste
  • 1 tablespoon Chinese rice wine (Shaoxing)*** or pale dry sherry
  • 1 tablespoon good quality low sodium soy sauce
  • 2 teaspoons sesame oil
  • 2 tablespoons water
  • 2 tablespoons waterhandful of coriander (cilantro) leaves, plucked from the stems
  • couple pinches of Kosher salt or sea salt
  • couple pinches of white pepper
  • 1 tablespoon vegetable oil

Directions:

  1. Rinse the fish well, both inside and out. If the fish is large (e.g., 2 pounds or more), score it at an angle all the way to the bone on both sides. Remember to score it in the opposite direction on the other side. This will help a larger size fish cook faster and more evenly.
  2. Season with Kosher salt or sea salt and white pepper on both sides and inside of the cavity.
  3. Smash a couple 2-inch stalks of scallions with the side of a knife to release it’s flavor. Place the smash scallions along with a couple large slices of ginger in the cavity of the fish.
  4. Place the remaining 2-inch stalks of scallions and remaining large slices of ginger on the bottom of a steamer basket/insert.
  5. Lay the fish on top of the scallions and ginger. This is important to do if you are steaming the fish on a plate because the ginger helps to elevate the fish, allowing the steam to reach the bottom side of the fish.
  6. Arrange the julienned ginger on top of the fish. Steam for 8-10 minutes for a 1 – 1/2 pound fish.
  7. Increase to 15-18 minutes for a large size fish. The fish is done when the flesh is no longer opaque, is flaky and lifts easily off the bone.
  8. While the fish steams, whisk together minced garlic, black bean paste, rice wine, soy sauce, sesame oil and water. Over medium heat, simmer in a small sauce pan with a lid on for 3-4 minutes then reduce the heat to low to keep it warm.
  9. Carefully remove the fish from the steamer basket and onto a serving plate. If using a plate, discard any liquid. It will not contribute good flavor and may even be bitter.
  10. Remove and discard the large pieces of ginger and scallion on the bottom side of the fish and inside the cavity but keep the julienned ginger on top of the fish.
  11. Top the fish with julienned scallions, Thai bird chili pepper and cilantro. Heat vegetable oil until hot and smoking. Pour the black bean sauce around the fish. If you prefer, pour the sauce directly over the fish. Some chefs recommend pouring the sauce around the fish so the sauce does not overwhelm the delicate flavor of the fish.Pour the hot oil over the fish. The hot oil will infused the fish further with the flavors from the scallions, coriander and Thai bird chili pepper.
  12. Smash a couple 2-inch stalks of scallions with the side of a knife to release it’s oil. Place the smash scallions along with a couple large slices of ginger in the cavity of the fish.
  13. Place the remaining 2-inch stalks of scallions and remaining large slices of ginger on the bottom of a steamer basket. Lay the fish on top of the scallions and ginger. This is important to do if you are steaming the fish on a plate because the ginger helps to elevate the fish, allowing the steam to reach the bottom side of the fish.
  14. Arrange the julienned ginger on top of the fish.
  15. Steam for 8-10 minutes for a 1 – 1/2 pound fish. Increase to 15-18 minutes for a large size fish. The fish is done when the flesh is no longer opaque, is flaky and lifts easily off the bone.
  16. While the fish steams, whisk together minced garlic, black bean paste, rice vinegar, soy sauce, sesame oil and water. Over medium-low heat, simmer in a small sauce pan with a lid for a couple minutes then reduce the heat to low to keep it warm.
  17. Carefully remove the fish from the steamer basket and onto a serving plate. If using a plate, discard any liquid. Remove and discard the large pieces of ginger and scallion on the bottom side of the fish and inside the cavity but keep the julienned ginger on top of the fish.
  18. Top the fish with julienned scallions, Thai bird chili pepper and cilantro.
  19. Heat vegetable oil until hot and smoking.
  20. Pour the black bean sauce around the fish. If you prefer, pour the sauce directly over the fish. Some chefs recommend pouring the sauce around the fish so the sauce does not overwhelm the delicate flavor of the fish.
  21. Pour the hot oil over the fish. The hot oil will infused the fish further with the flavors from the scallions, cilantro and Thai bird chili pepper.
No need to scrape the skin off of the ginger for the larger slices. Those will be discarded after the fish is steamed, along with the larger cuts of scallions.
Placing the larger cutes of ginger and scallion under the fish is important when the fish is steamed on a plate. Elevating the fish allows the steam to circulate under the fish.

This guy just fits into the steamer basket. I initially placed the larger cuts of ginger on the top of the fish and then discarded it. Instead, place the julienned ginger on top and don’t discard it. Only discard the large pieces of ginger and scallion placed on the bottom and inside the cavity. The julienne ginger will serve as a nice garnish and tender for consumption.
Coriander (cilantro) is optional. Some people do not like the taste of it. This is genetic.
There’s tender cheeks left here. It may arguably be the best part. Shhh … don’t tell anyone.
Add some dumplings and rice with a side of vegetables. The result is an elegant, easy to prepare and healthy dinner, any time, not just on Lunar New Year.

Turkey Chili

Turkey Chili, loaded with vegetables is easy and nutritious main course, perfect for a crowd on Super Bowl Sunday or for the family, as a weeknight dinner. Serve it with tortilla chips, over a baked potato or with corn bread.

This recipe can be made in a large, heavy duty pot but I prefer using a slow cooker. Preparing the chili the night before, then letting it slow cook all day for 4-8 hours, allows all the flavors to develop. Who wouldn’t enjoy coming home to a steamy pot, all ready to be consumed? In the words of Marie Kondo, this sparks joy in my world. I mean, I’ve “kon-mari’d” dinner into one pot, right?

This recipe uses lean ground turkey and loads up on vegetables. Unsweetened cocoa is the secret ingredient that adds depth and a “meaty” flavor, mimicking a traditional beef chili. As you may know, cocoa marries well with spices. I use four different chili spices: green chilis, Ancho chili, chili powder and a fresh Thai bird chili. Each contributes their own flavor and heat. The Ancho chili adds a little smokiness while the Thai bird chili adds a lot of heat. Since you may not have the option to pluck only one or two Thai bird chili peppers off of a plant like I did, you can simply increase the amount of chili powder. Be aware though, that most chili powder sold in the spice aisle, also contain garlic, salt and other ingredients. That might change the flavor of your chili. I also find that the amount of heat can vary from plant to plant, and from spice jar to spice jar.

The beans can be substituted for another variety or you may opt to use more of the same type of bean. You could even replace the roasted corn with chopped celery. Is there a wrong way to make chili? I casually asked friends what their secret ingredients in chili were. Their answers included riced cauliflower, peas, roasted tomatoes, roasted Poblano peppers, chocolate, cocoa powder, and cinnamon. I like to play with adding Worcestershire sauce or soy sauce too. Some people prefer beer over chicken or beef stock. Basically sky’s the limit.

* Note: You can always add more heat so start with 1 Thai bird chili pepper and 1 tablespoon chili powder. I prefer 2 Thai bird chili peppers and 1 ½ tablespoons of chili powder. As mentioned, most chili powder sold in the spice aisle, also contain garlic, salt and other ingredients so I prefer increasing the amount of heat with a fresh Thai bird chili pepper. Take care to wash your hands when handling and you might want to remove the seeds. It can be very spicy.

Serving size: 12

Ingredients:

  • 2 tablespoons olive oil
  • 1 large yellow onion, diced
  • 2 pounds of lean light meat ground turkey
  • 4-6 cloves of garlic, minced
  • 2 tablespoons tomato paste, preferably from a tube which has a more intense flavors
  • 1 – 2 fresh Thai bird chili pepper*
  • 1 – 2 tablespoon chili powder*
  • 1 teaspoon Ancho chili powder
  • 1 tablespoon dried oregano
  • 2 teaspoon ground cumin
  • 1 – 28 ounce good quality diced tomatoes or whole tomatoes, mashed
  • 1 – 4 ounce can of fired roasted green chiles
  • 2 bell peppers, diced (red, yellow, orange or green)
  • 2 cups roasted frozen corn (can substitute with fresh roasted corn and plain frozen corn)
  • 1 – 12 ounce can of kidney beans, with liquid
  • 1 – 12 ounce can of black beans, with liquid
  • 1 – 12 ounce can of garbanzo beans (chick peas), drained
  • 1 tablespoon unsweetened cocoa powder
  • 2 – 2 ½ cups of chicken stock (stock is richer than broth)
  • Optional ingredients: sour cream, shredded cheddar cheese, sliced green onion, diced onion, chopped cilantro, sliced Jalapeno peppers, tortilla chips, corn bread or baked potato

Directions:

  1. In a large skillet over medium high heat, add olive oil and sauté diced onion, until translucent.
  2. Add ground turkey and sauté, breaking up the meat until just cooked through.
  3. Add the garlic, tomato paste and all the spices and sauté for a couple minutes.
  4. Remove from heat and allow to cool.
  5. In a nonstick pot of a slow cooker, add diced tomatoes, green chiles, bell peppers, frozen corn, beans and cocoa powder. Add the cooled and cooked turkey mixture. Then add the chicken stock and combine.
  6. Cover with the lid and refrigerate overnight, if preparing this the night before.
  7. Set slow cooker on low for 4 – 8 hours.
  8. Serve over baked potatoes, with a side of corn bread or topped with tortilla chips. Add shredded cheddar cheese, sour cream, sliced green onion, freshly diced onion, chopped cilantro or sliced Jalapeno pepper.
  9. To freeze, allow to cool to room temperature and freeze for up to 3 months.

Beef Fajitas with Poblano Peppers, Bell Peppers and Onions

Fast and healthy dinners for the family are no Poblano, especially when loading it with lots of nutritious bell peppers, Poblano peppers, and onions. You can bump the nutritional value of this meal even further by serving it with homemade guacamole, made from nutrient dense and heart-healthy avocadoes.

You may already know that bell peppers are high in vitamin C, but did you know that Poblano peppers are high in vitamins A, B6 and B2? Vitamin A, is an antioxidant that protects the body from oxidative stress and prevents macular degeneration, a condition which can lead to blindness as we age. Studies show that vitamin B6 affects memory and brain function, including our mood and concentration. This is because vitamin B6 is necessary for the production of norepinephrine and serotonin which controls our mood and concentration. A deficiency of B6 contributes to Alzheimer’s disease. Vitamin B2 helps to prevent and treat anemia.

Poblano pepper also contains capsaicin, which gives the pepper its heat, although it’s relatively mild, especially if you remove all the seeds. Capsaicin has many health benefits, including increased metabolism and appetite suppression, which contributes to a decrease in body weight.

Another compelling reason to include Poblano peppers in this recipe is that its mild heat and flavor contributes nicely to all the complex flavors in this dish.

What I also like about fajitas is that it stretches the quantity of protein. The proper portion of protein is about the size of a deck of cards. If your habit is to consume a larger portion of protein, you may feel unsatisfied. Loading up with veggies, guacamole and pico de gallo is a tasty way to fill the belly and create a new habit of protein portion control.

* NOTE:  What’s the difference between skirt, flank or flap steak? Check out https://www.thekitchn.com/whats-the-difference-between-flank-steak-and-skirt-steak-meat-basics-212263  for the lesson on skirt versus flank. As for flap steak, which is also called sirloin tip, this was recommended to me by the butcher because they didn’t have skirt steak when I tested this recipe. The flank steak they had seemed fatty and the butcher said he’d prefer to have a fajita made from flap steak anyways because it’s the cut below the sirloin and in his opinion, tastier. I took his word for it. If you are reading this, I’m curious if you have an opinion on skirt versus flank versus flap steak?

Serving size: 4

Ingredients:

  • 1 – 1 1/4 pounds of skirt, flank or flap steak (also called sirloin tip)*
  • juice of 1 orange
  • juice of 1 lime
  • zest of 1 lime
  • 3 cloves of garlic, minced
  • ¼ cup of olive oil + enough olive oil to coat peppers and onion
  • ¼ cup chopped cilantro
  • 1 teaspoon ground cumin
  • 1 teaspoon chili
  • 1 teaspoon ground coriander
  • 1 teaspoon dried oregano
  • pinch of Kosher salt
  • 2-3 bell peppers, depending on size (red, yellow and orange), sliced thinly
  • 2 Poblano peppers, seeds removed and sliced thinly
  • 1 small or ½ large yellow onion, sliced
  • flour or corn tortillas, warmed (we like to wrap our tortillas in foil and warm it in a preheated oven set at 250F)
  • pico de gallo or J’Wow’s Salsa (optional)
  • salsa (optional)
  • sour cream (optional)
  • sliced Jalapeno peppers (optional)
  • homemade guacamole (optional)

Directions:

  1. Prepare the marinade by whisking together orange juice, lime juice, lime zest, garlic, olive oil, cilantro, cumin, chili, coriander, oregano and salt together. Place the steak in a ziplock bag and pour the marinade over the steak. Seal the bag and massage the marinade into the meat to ensure it’s evenly distributed. Marinade the beef in the refrigerator for at least an hour but longer is better.
  2. In a separate bowl, drizzle olive oil over the onions and peppers. Season with a pinch of Kosher salt.
  3. Allow the meat to come to room temperature before cooking.
  4. Heat a grill skillet over medium-high heat. Brush the grill with vegetable oil unless using a non-stick skillet. Cook the meat for about 4 minutes on each side, depending on the thickness. Then place the meat on a plate and cover with aluminum foil. Let it rest for at least 10 minutes.
  5. While the meat rests, add the peppers and onions to the grill pan and cook until the veggies start to brown and soften. Alternatively, you can sauté the veggies in a cast iron skillet. Cast iron skillets are a great way to add iron to your diet.
  6. Just before the vegetables are finished, slice the meat thinly, on an angle and against the grain.
  7. Serve with warm tortillas with your choice of pico de gallo, salsa, homemade guacamole, sour cream and Jalapeno peppers. We enjoyed our fajitas with pico de gallo and homemade guacamole.

Poblano peppers are relatively mild, especially if unripened (green) and de-seeded and de-veined. When allowed to ripen and turn red, then dried, it is called “Ancho” The green version adds a mild and interesting flavor to the fajitas.

Skirt, flank and flap cuts of beef can be chewy. Marinading in an acid, like orange and lime juices, helps to break down some of connective tissue and membrane. Cutting the meat after resting it for about 10 minutes, on an angle and against the grain tenderizes the meat. This is what it looks like to cut with the grain. The acid in the marinade did it’s job and tenderized the meat but it was definitely chewier than the piece of meat in the photo below.
Here is what it looks like to cut against the grain. Hmm, tender and juicy.

I often enjoy fajitas without the tortilla, which turns it into a low carb dinner.

Linguine with Mussels and Tomato Sauce

Mussels. Not the gun show in between my shoulder and elbow, although I really should start pumping iron during the off-season. I’m referring to the bivalve molluscs. And speaking of iron, they are nutrient dense with iron, zinc and vitamin B12.

I didn’t love mussels until I visited Les Halles in New York City over 20 years ago. Fans of Anthony Bourdain will know this restaurant was the backdrop to his infamous tell-all best seller, “Kitchen Confidential”. As I recall, Les Halles offered mussels prepared at least 6 different ways. They were served with the most delicious side of pommes frites (French fries). These were among the best fries I’ve ever had. Moules à la Normande was my favorite style. I highly recommend you buy a nice loaf of French bread and find this recipe in his cookbook. You’ll want to soak up all the sauce with the bread or slurp it with a spoon. Although you can search for the recipe on the web, I encourage you to buy the cookbook or borrow it from your local library. You’ll discover so many other recipes which made Les Halles and Tony famous.

Now that I’ve told you where to find one of my most favorite recipes, here’s what you can do with the other half of the ginormous bag of mussels you might have bought at Costco to make Moules à la Normande.

Linguine with Mussels with Tomato Sauce is a fast family meal and a great follow-up to Moules à la Normande.

Serving size: 4

Ingredients:

  • 2 pounds of mussels, scrubbed, de-bearded and rinsed*
  • ¾ pound of linguini or spaghetti
  • 1 – 28 ounce can of good quality crushed, diced or whole tomatoes, (roughly crushed if not already crushed)
  • 4 slices of think bacon, diced
  • 3 garlic cloves, minced
  • 1 large shallot, thinly sliced crosswise
  • ¼ teaspoon of red pepper flakes
  • ½ cup of dry white wine
  • 1/3 cup flat leaf parsley, chopped
  • 1 tablespoon lemon zest, freshly grated
  • Pinch of salt or sugar (optional)

Directions:

  1. Bring a large pot of water to boil. When the water comes to a boil, follow the package instructions for cooking the pasta.
  2. Using a wide skillet with lid over medium-high heat, sauté bacon until it starts to brown slightly and fat is rendered. Add shallot and continue stirring occasionally until bacon is almost fully cooked. Watch the shallots so they don’t get too brown. Add minced garlic and red pepper flakes. Stir for about 30 seconds. Add white wine. Bring to a boil to cook off some of the alcohol and then add crushed tomatoes. Taste. If the sauce is too acidic, add a bit of sugar to taste. I prefer to avoid adding sugar but sometimes the canned tomatoes are a bit too acidic. You may also want to add salt however I typically find that no additional salt is necessary.
  3. Add mussels. Cover with lid and cook, giving the pan a good shake a couple of times over 2 to 4 minutes, until the mussels open up. Discard any mussels that do not open up.
  4. Place cooked and drained pasta in individual pasta bowls or one big platter/pasta serving bowl. Ladle the mussels and tomato sauce over the pasta. Sprinkle with with lemon zest and chopped parsley before serving.

* NOTE: Mussels should be scrubbed well, de-bearded. Farm-raised mussels may already be filtered, scrubbed and de-bearded saving a lot of prep time. If the mussels need to be de-beared, start the cleaning process about an hour before cooking. Begin by creating a iced saline solution. Some sources recommended a 3% saline solution which is similar to the natural environment mussels live in. Apparently tap water can kills mussels.

In a large bowl with water and ice, stir in about 1/4 cup of Kosher salt per 3 cups of water, and 3-4 tablespoons (about 1/4 cup) of flour. The mussels will consume the flour and hopefully expel any sand, ensuring a more pleasant dining experience. Add ice to keep the water nicely chilled. Then add the mussels, tossing out any mussels with broken shells or remain open after you tap them. Sometimes I de-beard the mussels prior to placing them in the ice water solution. Sometimes I de-beard them just before I’m ready to cook because the process of de-bearding (removing the filament) can kill the mussel. It seems that you can get the mussels to release the filament without killing it by pulling the beard towards the “hinged” part of the shell.

Discard any mussels that remain open prior to cooking. A live mussel will close up when touched, then open up after cooking.rinsing the mussels.

If using whole canned tomatoes, crush them roughly with a potato masher.

Easy Ramen Chicken Soup

Soup is comfort and love in a bowl. Whenever I visited my parents, one of my mother’s many loving offerings included homemade soup. Today it was my turn to make the offering. My darling came home early from work with a low grade fever and headed straight for bed. I needed to get him some nourishment pronto. It needed to be easy to digest and quick to prepare. A quick assessment of our inventory revealed the usual staples on hand: chicken broth, ramen noodles, eggs, garlic, ginger, scallions and carrots. A fortuitous supply of bok choy, Napa cabbage and shiitake mushrooms left over from another meal spelled out “ramen soup” in my head, in flashing neon lights. I quickly ran off to purchase a store roasted chicken. About 40 minutes in the kitchen later, I offered him love in a bowl.

My version of Easy Ramen Chicken Soup uses both prepared broth and dried seasonings. Traditional Japanese ramen uses fresh noodles and the broth is created over many hours from ingredients like kelp, chicken or pork. Korean style ramen uses dried noodles and dried powdered seasoning. I love both styles so I took a short-cut, combining a bit of both and used a Chinese 5-spice powder. Please forgive me.

Serving size: 4

Ingredients:

  • 1 store roasted chicken, sliced; wings and bones removed and reserved (omit or substitute with tofu for vegetarian version)
  • 2 – 32 ounce low-sodium chicken or vegetable broth
  • 1 tablespoon or about 2 inches of freshly grated ginger
  • 3 cloves of garlic, minced
  • 1 medium onion, sliced
  • 1 – 2 teaspoons of Chinese 5-spice (start with 1 teaspoon and add more to taste)
  • 1/4 cup of low-sodium soy sauce or tamari
  • 4 eggs, rinsed
  • 6 ounces of ramen noodles (I like the millet & brown rice ramen which is gluten-free)
  • 4 cups of bok choy, napa cabbage or baby spinach (rough cut the bok choy or cabbage into 2 inch pieces)
  • 2 cups carrots, grated or cut match stick size (Trader Joe’s sells grated and washed carrots)
  • 12 fresh shiitake mushrooms
  • 2 stalks green onion, thinly sliced
  • hot chili oil or sriracha hot chili sauce (optional)

Directions:

  1. Remove the chicken wings and set aside. Remove the meat from the thigh and leg, and set the bones aside. Careful, the chicken will be hot internally.
  2. In a medium pot, combine the wings, bones, broth, soy sauce, onions, ginger, garlic and 5-spice. Bring to a boil, then lower to medium-low heat and simmer for about 30 minutes.
  3. In another medium pot, bring water to a boil. Add the rinsed eggs and boil for about 7 – 9 minutes. (I prefer a 7 minute softer boiled egg.) You will want to rinse the eggs before because they will be cooking in the same boiling water as the ramen noodles. Cook the noodles according to package instructions, timing it so the eggs and noodles finish cooking at the same time. For example, the ramen noodles I purchased needed only 4 minutes to cook. So added the eggs to the boiling water and set the kitchen timer for 3 minute. After the eggs cooked for 3 minutes, I added the noodles, and set the timer for an 4 additional minutes.
  4. Once the eggs and noodles are cooked, remove the eggs and place them in cold water. This will make it easier to peel the egg shell.
  5. Using tongs, portion out the noodles into individual large bowls. Rinse out the pot and set it aside to use again. IMG_6241If you are on a gluten-free diet, I recommend this millet and rice ramen noodle brand.  IMG_6239
  6. Prepare the vegetables and finish slicing the chicken meat while the broth simmers.    IMG_6237.jpg
  7. Place the chicken on top of the noodles. Remember, a serving size of protein should be the size of a deck of cards (about 3-4 ounces). I tend to consume about 2 ounces or less for myself or I just omit the chicken since the egg is a source of protein.
  8. Peel the eggs and slice in half. Place two halves in each bowl. IMG_6244
  9. Once the broth has been simmering for about 30 minutes, turn off the heat. Place a fine meshed strainer over the empty pot used to boil the noodles and eggs. Carefully ladle the very hot broth over the strainer, transferring all the broth to the other pot. I like to pick out the onions and throw them back into the broth. You might find some good little pieces of chicken meat to toss back in too. Discard the bones and other solids.
  10. Carefully taste the hot broth and adjust the seasoning. You might be tempted to add a little hot chili oil or sriracha sauce too. Turn the heat back on to bring the broth back to a simmer. Toss in the grated carrots, greens and mushrooms. Stir and simmer for 2 minutes to soften the vegetables.
  11. Ladle over the noodles and chicken. Top with sliced green onions. Deliver with love. IMG_6175 IMG_6251


Briley’s Fettuccine Alfredo with Broccoli, Peas, Mushrooms, and Sun-dried Tomatoes

What do you do when a 15 year old requests Fettuccine Alfredo for his birthday dinner?  First you cringe a little because this pasta with cream and butter has virtually no nutritional value and is truly bland in flavor.  Then you remember that even the Hungry Athlete loved Alfredo sauce when she was a kid.  With Halloween around the corner, looks like the Hungry Athlete had to use a little witch craft to create a healthier version of a teen’s favorite meal.  To ensure Briley’s birthday dinner would be a big treat, I had a couple tricks up my sleeve.

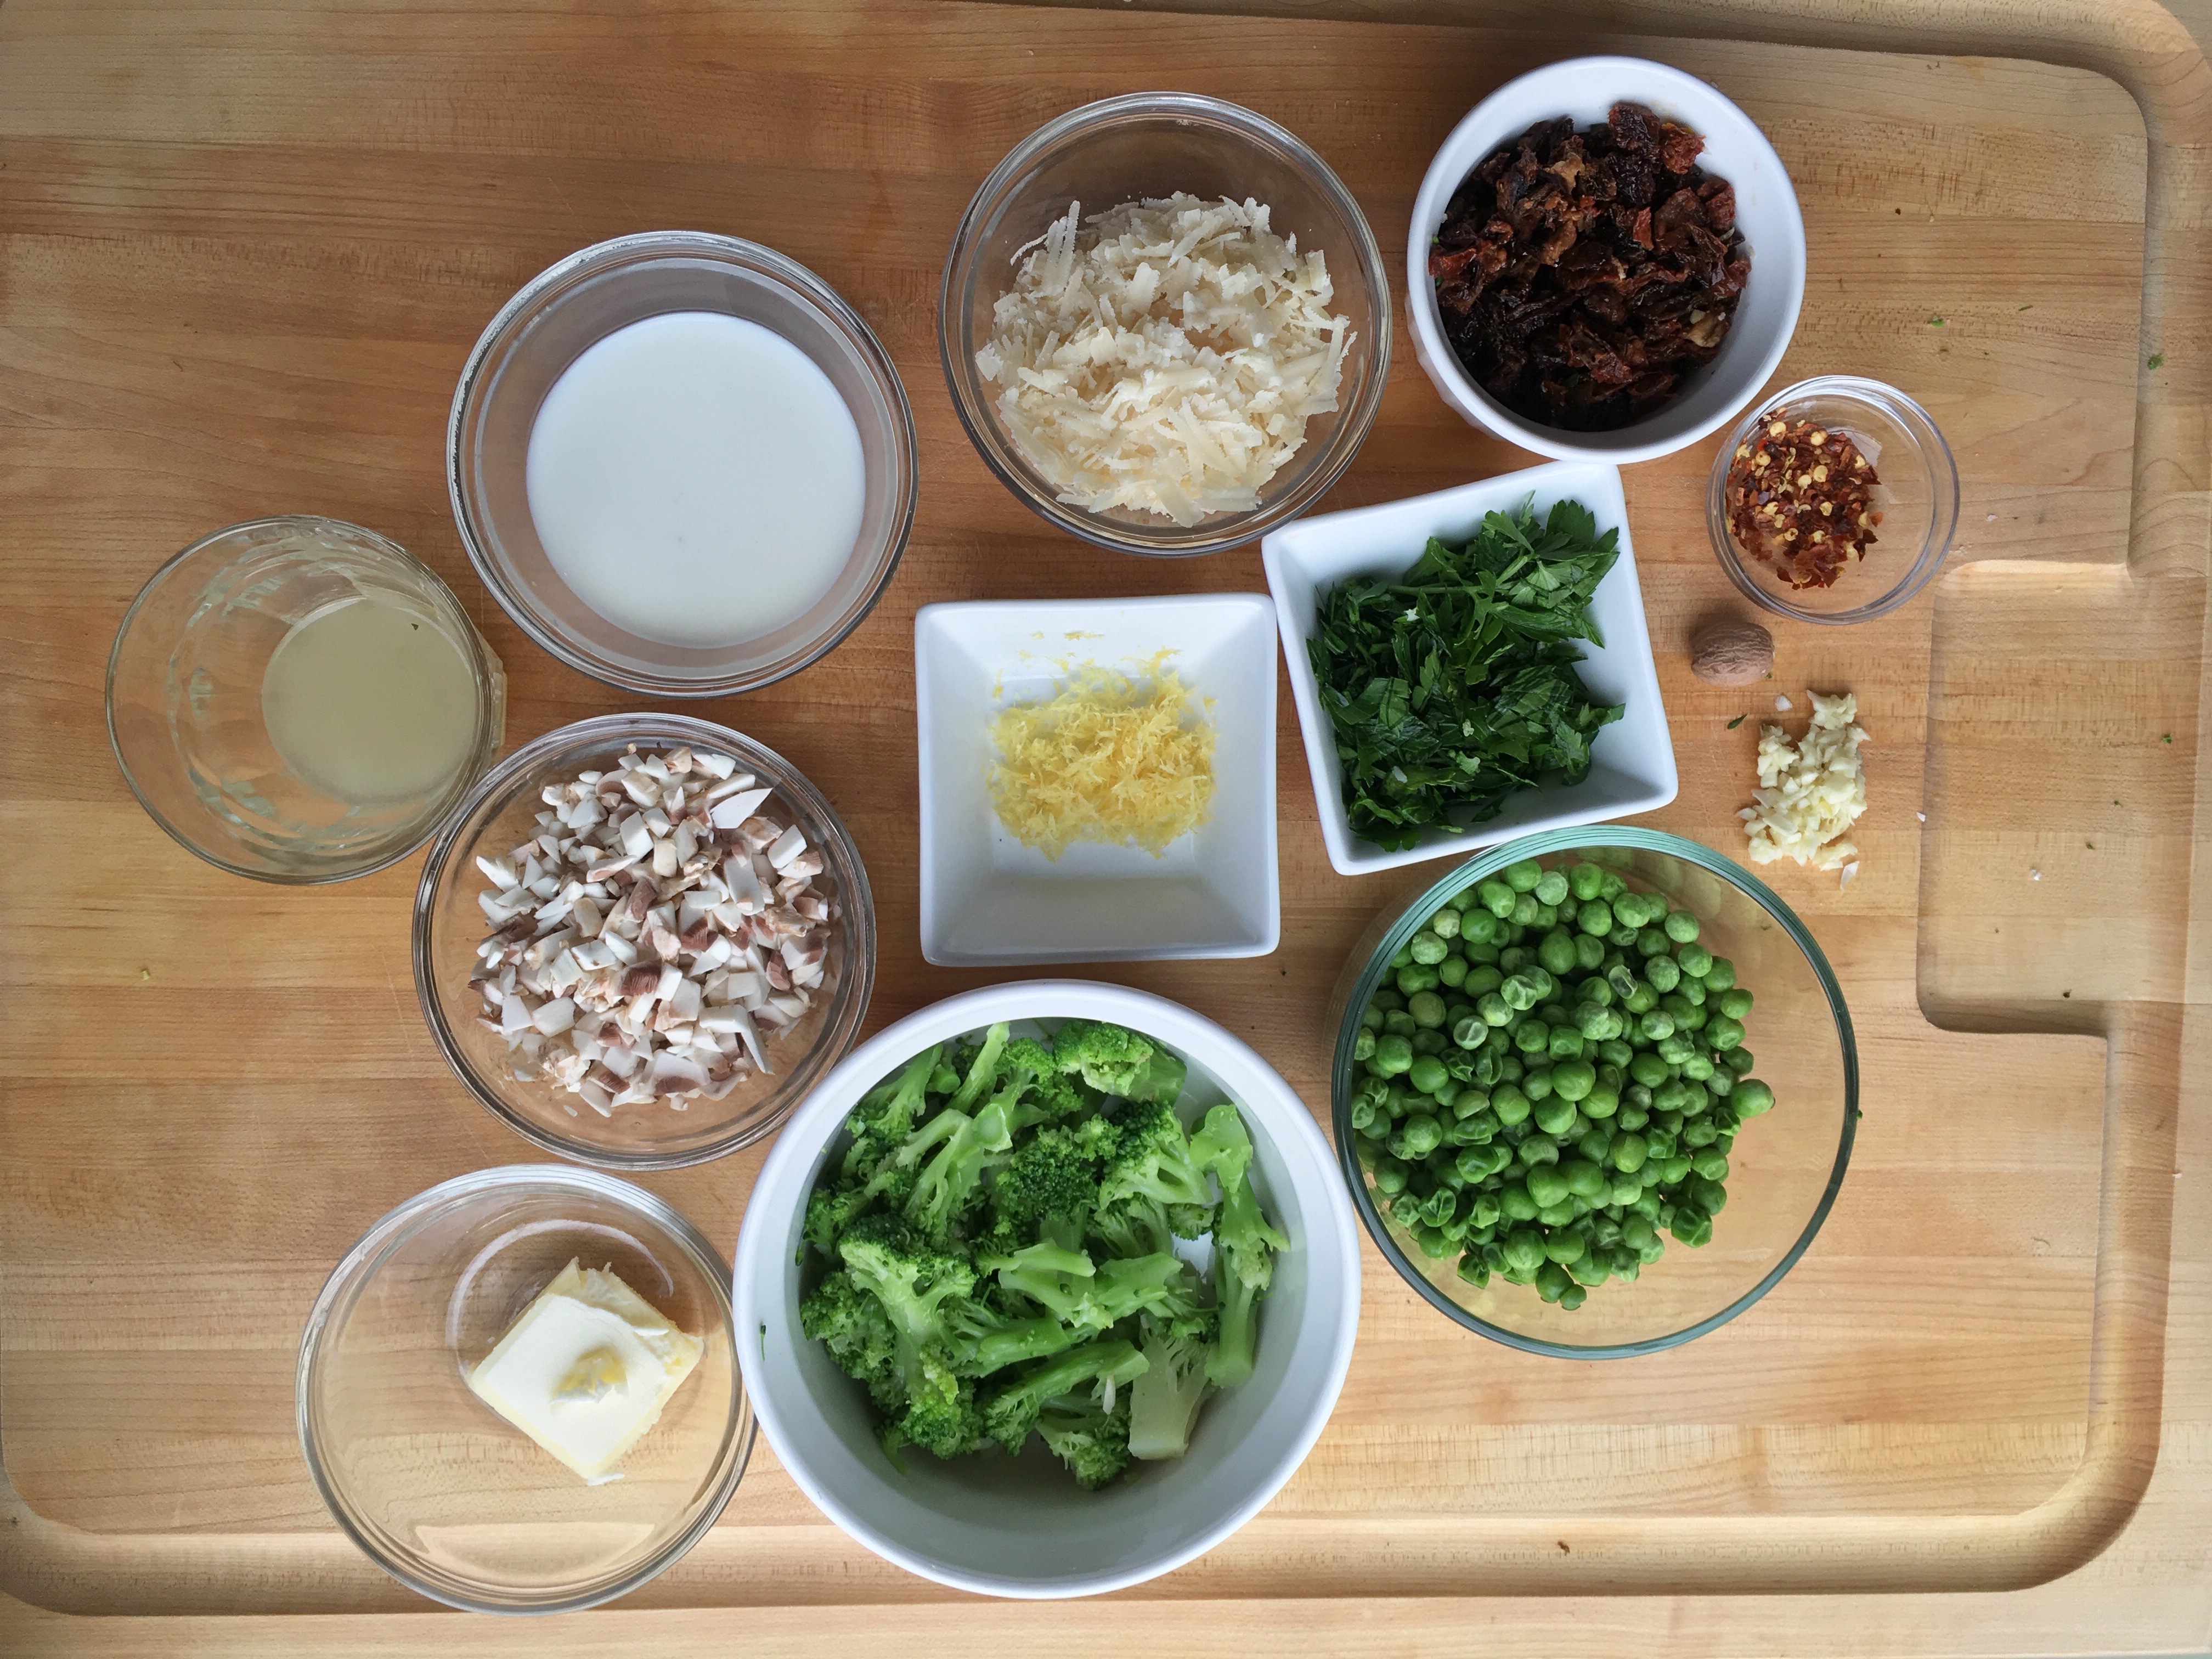
The first trick was to sneak in vegetables (muhahahaha).  I loaded the pasta with four vegetables which have some of the best sources of vegetable protein: peas, broccoli, sundried tomatoes and mushrooms.  In the version I made on Briley’s birthday, I confess to using a sleight of hand to hide the vegetables.  I simply diced the vegetables into the size of peas.  Now that my secret is out, the final recipe calls for larger bits of broccoli, mushrooms and sun-dried tomatoes.  This makes the pasta more pleasing, both visually and texturally.

The final trick is to turn the heavy cream into a disappearing act.  Typical American Fettuccine Alfredo is made with 1 1/2 cups of heavy cream, 2 tablespoons of butter and Parmigiano-Reggiano, along with a pinch of nutmeg.  I understand that the original and authentic Italian Alfredo sauce is made of only three ingredients: fettuccine, 2 sticks of butter (wow) and Parmigiano-Reggiano.  Either way, that’s a lot of cream or butter.  So instead of all the heavy cream, I threw into the cauldron some magic: Neufchatel.  No I didn’t sneeze and my cauldron was actually a large All-Clad saute pan.

Named after a town in Normandy, Neufchatel is one of the oldest of French cheeses and typically produced in the shape of a heart.  According to cheese folklore, American cream cheese was created when an American dairyman added cream to the recipe for Neufchatel.  Real French Neufchatel is made with raw cow’s milk. American Neufchatel is made with pasteurized cow’s milk and cream.  American Neufchatel has about 33% less fat than cream cheese and is sometimes called farmer’s cheese. Creamy and slightly tangy, it tastes a lot like cream cheese and a lot better than heavy cream.  It is found next to the cream cheese in the grocery store.

Neufchatel and Parmigiano-Reggiano combine with milk into a creamy Alfredo sauce.

Here’s how Neufchatel compares:

  • 2 tablespoons Neufchatel is about 70 calories and 6 g of fat
  • 2 tablespoons butter is about 240 calories and 24 g of fat
  • 2 tablespoons heavy cream is about 200 calories and 10 g of fat of which 7 g is unsaturated fat

I was afraid of disappointing a teenager on his birthday and tested a version with a couple tablespoons of cream, a version with whole milk and a third version with low-fat milk. I found the milk versions to be creamy, rich and delicious. Happy birthday Briley! This sauce was created just for you, to keep you healthy and to fuel your workouts.  May you continue to run those trails fast and strong for years to come.

If you prefer a non-vegetarian version, chicken, poached in a pan, adds more protein and accompanies the pasta nicely.  Check out this website for a foolproof, easy and fast way to prepare chicken for pasta and salads:

http://www.thekitchn.com/how-to-cook-moist-tender-chicken-breasts-every-time-cooking-lessons-from-the-kitchn-36891

Serving size: 4

Ingredients:

  • 8 ounces of your favorite pasta* (I prefer fettuccine or penne)
  • 3 tablespoons unsalted butter
  • 2/3 cup chopped white mushrooms
  • 1 large clove garlic, minced (or grated)
  • 1/2 teaspoon grated lemon zest
  • 3 tablespoons Neufchatel* cheese
  • ½ cup grated Parmigiano-Reggiano cheese
  • ¼ cup lemon juice
  • ¼ cup whole or low-fat milk (I prefer organic whole milk**)
  • ¼ teaspoon crushed red pepper flakes or ¼ teaspoon white pepper
  • pinch of fresh ground nutmeg
  • 1 cup chopped defrosted frozen broccoli
  • ¾ cup frozen peas
  • ¼ cup chopped parsley
  • ½ cup of chopped sun-dried tomatoes***
  • salt (You probably won’t need this. Any additional salt due to the saltiness of pasta water, the sundried tomatoes and Parmesan cheese.)

*Note: 8 ounces of uncooked long pasta shapes = 1 1/2-inch diameter bunch = 4 cups cooked pasta

**Note: Non-fat or reduced fat milk requires additional processing to remove the fat and then to put the 1% or 2% fat back.  I prefer less processed foods.  Your taste buds can easily be adjusted from non or low fat to whole milk.

***Note:  Sun-dried tomatoes in oil can be used however I prefer to use sun-dried tomatoes not in oil.  These has a longer shelf life however need to be soaked in water for about 30 minutes before chopping and cooking.

Directions:

Timing is everything in this dish.  As soon as the pasta is cooked it should be transferred directly to the pan with the Alfredo sauce.  The ensure good timing, prepare all of the ingredients in advance then start cooking the pasta.

alfredo7

If you are using dry pasta, allow 5 minutes to prepare the Alfredo sauce.  If you are using fresh pasta, have a pot of water boiling and ready for the pasta and toss in the pasta just before you finish making the Alfredo sauce.

To make the sauce, melt 1 tablespoon of butter in a large sauté pan over medium heat.  Sauté the mushrooms for a couple minutes, then remove from pan and set aside.

Melt the remaining butter in the same pan over medium heat.  Add the garlic, red pepper flakes and lemon zest.  Stir for 1 minute.

Lower the heat and whisk in the Neufchatel, Parmigiano-Regiano and lemon juice until cheese is melted and smooth.  Whisk in milk for 1 minute.  Whisk in fresh nutmeg for another minute.

As soon as the pasta is cooked al dente, place it into the pan and coat the pasta with the Alfredo sauce over medium heat.

alfredo1
Fettuccine is the traditional pasta used with Alfredo sauce. Here I used penne pasta.

Toss in mushrooms, broccoli, peas, sun dried tomatoes and half the parsley.

alfredo5

Serve immediately with remaining parsley garnished on top.

alfredo2

Crispy Salmon and Colcannon (Irish Potatoes with Cabbage, Kale and Leeks)

Happy St. Patrick’s Day, Hungry Athlete style! Irish comfort food, colcannon, is mashed potatoes made with kale or cabbage. On Halloween, charms are hidden inside the colcannon. If you find a ring, it means you will someday marry; if you find a thimble, you are doomed to be a spinster.  Who knew mashed potatoes could be so exciting? There’s even a song about it: https://www.youtube.com/watch?v=TCQbksGz67U Colcannon is traditionally served with Irish bacon or boiled ham, however, since my coach is evaluating my diet this week, I decided to pair it with salmon.  I omitted the butter (and the ring and thimble) from the colcannon and saved it to prepare a sauce for the salmon.  And instead of using just kale or cabbage, I combined both and added leeks to pack a variety of nutrient rich vegetables into the colcannon.  The vegetables are typically chopped finely, blanched to soften, then combined with the potatoes.  To create a smoother colcannon, I lightly pulsed the vegetables in a food processor after blanching.  (A blender can be used as well.)  This saved me some chopping time and I liked the texture.  If you prefer a more rustic colcannon, just chop the vegetables up more finely at the beginning and skip the food processor. Colcannon is great for breakfast too!  Try using leftover colcannon for Colcannon with Poached Eggs and Smoked Salmon. Serving size: 4 Crispy Skin Salmon Ingredients:

  • 12 ounces of wild salmon, skin on (3 ounces per person)
  • 1/2 cup olive oil
  • Kosher salt and pepper
  • 1/2 teaspoon of lemon zest
  • juice of 2 lemons
  • 1 tablespoon finely chopped shallot
  • 4 tablespoons butter

Colcannon Ingredients:

  • 2 pounds of potatoes, peeled and cut in large even chunks
  • 1 leek, rinsed well and chopped
  • 3 scallions stalks or 2 spring onion stalks, finely chopped
  • 1/3 cabbage, rough chopped (about 4 cups)
  • 4 curly kale leaves, stem removed and rough chopped (about 4 cups)
  • 1/4 cup of milk or 2 tablespoons Greek yogurt
  • 2 tablespoons sour cream
  • Kosher salt and pepper

Directions: Colcannon Place the potatoes in a large pot of water with a little salt. Bring the water to a boil for 5 minutes or until potatoes are fork tender. Drain the water from the pot.

DSC_6999
If you prefer a more rustic colcannon, chop the vegetables up more finely than this and skip using the food processor or blender.

Bring another large pot of water to a boil. Blanch the vegetables. First, add the leeks and cabbage to the boiling water. After 5 minutes, add the kale and continue blanching for another 4 minutes until all the vegetables are bright in color and tender. Then add 2/3 of the scallions or spring onions for 1 more minute. DSC_7001 Reserve about 1/4 cup of the hot greenish water from the pot. The water contains nutrients and can be used to add moisture to the potatoes. Then strain or remove the vegetables from the water and place in a food processor or blender. Season with salt and pepper and pulse until all of the vegetables are combined.

DSC_7003
Pulse it gently for a more rustic texture but definitely do not puree it. Some texture is good.

Add sour cream and milk or Greek yogurt to the potatoes. Mash the potatoes. If it appears dry, add a splash of the reserved vegetable water. Season to taste with salt and pepper. Stir in the vegetable mixture until just combined. It’s a rustic dish so I prefer chunks of white mashed potato with the green vegetables speckled throughout. Place a lid on the pot to keep the colcannon warm.

DSC_7007
Traditionally, a well is created in the middle and a Irish butter is added. By adding sour cream or Greek yogurt, I didn’t miss the butter. In addition, that allowed me to allocate the butter to creating a lemon butter sauce for the salmon.

Salmon Rinse the salmon and remove any bones. Pat dry with paper towels then slice the salmon into 4 pieces. Score the skin of the salmon by making a few shallow, diagonal cuts on the skin. This will help the skin crisp up but not curl up when cooked. Coat each piece with 1 tablespoon of olive oil, then season well with salt and pepper. Allow the salmon to sit at room temperature for at least 10 minutes before cooking. In a large nonstick frying pan, heat the remaining olive oil on medium high heat. When the oil is hot, but not smoking, carefully drop the salmon on the pan, skin side down. Depending on the thickness of the salmon, cook for about 5 – 6 minutes watching the color change on the cut side of the flesh. When the color changes for 3/4 of the salmon, flip the salmon over and continue cooking for about 2 more minutes. This is called unilateral (uneven) cooking and ensures a crispy skin.  I usually   flake off a piece of the salmon with a fork to inspect for doneness.  A meat thermometer can also be used.  The salmon is done when the tiniest sliver of flesh is almost cooked or the temperature is 125F – 130F.  Remove the salmon from the pan and let it rest for at least 5 minutes.  The salmon will continue to cook through. After the salmon is removed, heat the pan back up on medium heat.  Add 1/2 teaspoon of lemon zest, lemon juice, shallot and a pinch of salt.  Stir and simmer until the lemon reduces almost in half, then slowly add slices of cold butter, swirling the pan around to incorporate the butter. Place the salmon on a bed of colcannon. Spoon over the lemon butter sauce.  Sprinkle some reserved green or spring onion on top for garnish. DSC_7019

Vegetarian Tofu Tacos with Mango Salsa

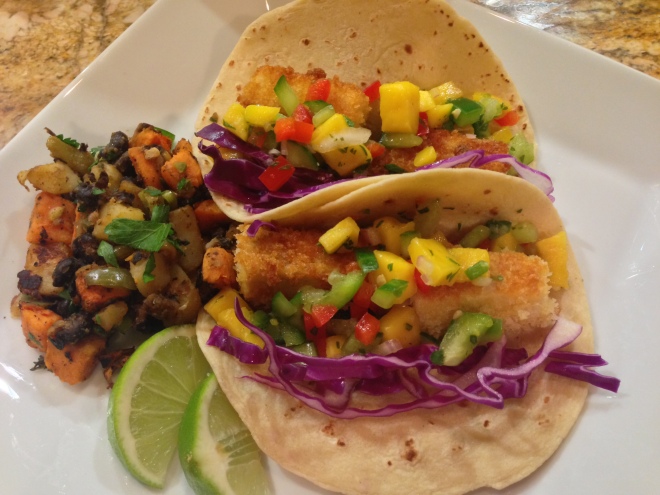
Crispy, full of flavor and a fun meal to eat, you will not miss the fish in this Vegetarian Tofu Tacos with Mango Salsa.

Coating the tofu with panko bread crumbs then pan frying them in oil yields a crunchy exterior and a tender interior. Layer the tofu with Mango Salsa and Purple Cabbage and Carrot Slaw which can be prepared in advance.

Serving size: 4 (2-3 tacos per person)

Ingredients:

Pan Fried Tofu

  • 1 package firm or extra firm tofu
  • 1 cup panko bread crumbs
  • 1/4 cup corn starch
  • 1 egg
  • salt and pepper
  • 1/2 teaspoon cayenne pepper
  • Vegetable oil
  • Flour or corn tortilla

Purple Cabbage and Carrot Slaw

  • 2 cups of finely shredded purple or red cabbage
  • 1 cup of shredded carrots
  • 1/4 cup fresh lime juice
  • 2 tablespoon vegetable oil
  • 1 teaspoon salt
  • 1/2 teaspoon sugar

Directions:

Prepare the Mango Salsa.  This can be prepared the day before.

Prepare the Purple Cabbage and Carrot Slaw by whisking together the lime juice, vegetable oil, salt and sugar. Toss in the cabbage and shredded carrots. Set aside.

Place the tofu in a sieve and pour boiling hot water over it. This will help draw out moisture. Dry out tofu by placing them in between paper towels and sandwiched in between two plates.   Weigh the plate down with a 28 ounce can or something of similar weight for at least 15 minutes.

In a shallow dish, combine the panko bread crumbs with cayenne pepper. Place the corn starch and lightly beaten egg, each in its own separate shallow dish.

After the moisture is drawn out of the tofu, cut the tofu into 4 x 1 inch pieces then season with salt and pepper.

Coat the tofu with the corn starch, then dip it in the egg and then coat it with the panko bread crumbs.

Over medium high heat, heat enough vegetable oil to coat a non-stick frying pan. Test the oil temperature by dropping in a piece of the panko bread crumbs. The oil should bubble around the bread crumbs and start turning it brown. If the oil smokes, the pan is too hot.

Fry the tofu until golden brown on each side. Drain on a paper towel.

Warm the tortilla in a hot pan for a couple minutes on each side until warm. Assemble the taco by placing some slaw in the middle of the tortilla. Next add a couple pieces of the tofu and top with the Mango Salsa. Serve with a couple extra slices of lime, hot sauce and a side of my Sweet Potato, Bean and Corn Hash.

DSC_6949

IMG_8477

IMG_8480

Cod Baked with Tomatoes, Artichokes and Lemon (Psari Plaki)

Psari Plaki is a traditional Greek style of baking fish with olive oil, tomatoes and vegetables. The Hungry Athlete’s version is cooked in parchment paper and was inspired by one of my father’s best friends and tennis partner, Gene Cohen. Gene owned the Somerville Inn, a New Jersey restaurant and banquet hall, with his wife Barbara. Both had passed away over 20 years ago. Barbara Cohen was a successful children’s book writer. Her first book, The Carp in the Bathtub, is a childhood favorite of mine. I have a fond memory of Barbara reading this book to me. Barbara also introduced me to my first peach. She had a gentle way about her and taught me not to be afraid of the fuzzy fruit. I attempted  to eat three that day. If you are looking for good children’s books, I highly recommend her books. Here’s more about Barbara:

http://jwa.org/encyclopedia/article/cohen-barbara

One summer, my family was invited to the Jersey shore by the Cohens. Mr. Cohen prepared one of the most delicious fish I ever had as a child.  Whenever my father dined with friends at the Somerville Inn, Gene would not allow my father to order from the menu.  Gene insisted on asking my father what he felt like eating and my father always answered” You surprise me”.  My father told me that he “had wonderful meals, not from the menu.”

We must have had insatiable and disappointed eyes after we devoured the fish because Gene immediately ran out to buy more. When he returned with more fresh fish, Gene had my father’s and my undivided attention. Although we studied how Gene created this heavenly dish, all I remember now is that the fish was cooked in a tomato sauce, with possibly ketchup added, and wrapped in aluminum foil. But more than 30 years later, I remember how it tasted,

In my first few attempts to replicate Gene’s recipe, I experimented preparing the fish with canned diced tomatoes and ketchup. It didn’t achieve the flavors I remembered. Ketchup also has too much sugar in it so I substituted it with tomato paste. Next, I exchanged canned tomatoes for fresh tomatoes. The Jersey shore has lots of wonderful fresh tomatoes in the summer so I suspect Gene used fresh tomatoes. I also replaced the aluminum foil with parchment paper. The foil can react to and possibly impact the flavor of acidic ingredients, such as tomatoes, white wine and lemon juice.

Although my tongue cannot confirm for sure if I replicated the flavors from 30 years ago, I think it’s fairly close. With every bite, I am brought back to that evening, at the Jersey shore with Gene and Barbara Cohen, who introduced me to new foods when I was a child and who were great family friends.  No carp in the bathtub here, only cod in parchment.

Serving size: 2 

Ingredients:

  • 1 pound cod or halibut, cut in half
  • 1/2 cup of olive oil
  • 1 medium red onion (about 1 cup), sliced thin
  • 4 cloves of garlic, sliced
  • 1/2 cup white wine
  • 2 tablespoons tomato paste
  • 1 1/2 cups yellow and red grape tomatoes, cut in half lengthwise
  • 1/2 cup of rough chopped parsley
  • 2 sprigs of fresh thyme
  • 2 springs of fresh oregano
  • 2 teaspoons freshly grated lemon zest
  • 2 lemons, cut each lemon into 2 thin slices (4 slices in total) and then juice both lemons (about 1/2 cup lemon juice)
  • salt
  • pepper
  • 1 cup canned artichoke hearts, drained and cut in halves

Directions:

Preheat oven to 350F.

Inspect the fish for bones. I keep a tweezer in the kitchen specifically for removing small fish bones. After removing any bones, rinse the fish and pat it dry with paper towels. The fish should be dry to absorb all the great flavors you will be adding to it later. Set the fish aside. The fish should be covered and returned to the refrigerator if you have not prepared all the vegetables in advance.

In a fry pan over medium heat, sauté sliced red onion and sliced garlic in 1/4 cup of olive oil until tender and fragrant.

DSC_6908

Stir together tomato paste and white wine, then add the mixture to the onion and garlic.

Add the tomatoes and lemon zest. Season with salt and pepper, then continue to sauté for 5 minutes or until sauce thickens.  Stir in the fresh parsley, then remove it from the heat and set aside.

DSC_6910

Tear off two generous pieces of parchment paper large enough to wrap the fish with the tomatoes, onion and artichokes. To prepare the parchment packets, place one tablespoon of olive oil in the middle of each piece of parchment paper, then place the fish on top of the olive oil. Spoon another tablespoon of olive oil on top of the fish and pour 1/4 cup lemon juice on top of each fish fillet. Season the fish well with salt and pepper.  Next, place one sprig of thyme and one sprig of oregano on top of each fish fillet.

IMG_8433

Place 1/2 cup of artichokes around each fish. Finally, spoon the tomato mixture on top of the fish and artichokes. Be careful not to cover the thyme and oregano. This ensures you and your dinner guest will be able to see the herbs and put them on the side of the plate. Nobody really wants to eat whole sprig of thyme or oregano.

Wrap the parchment paper around the fish and ensure the edges are enclosed tightly. Here’s a video demonstrating how to wrap the fish the proper French way: http://www.finecooking.com/videos/fish-in-parchment.aspx . This method ensures the steam is trapped inside the packet, however when I’m in a rush, I wrap the fish by turning the fish so it’s longest horizontally.  I then grab the top and bottom ends of the parchment paper and and turn over the edges over a couple of times. Just make sure to fold it tightly together. Next I fold the long ends in, forming a triangle, like wrapping a present.  Lastly, I tuck in the triangle ends under the fish.

DSC_6724

DSC_6725

Bake for 15 minutes or more depending on the thickness of the fish. You can serve the fish in the parchment packet. Just cut a slit down the top of the paper to reveal the fish or you can carefully remove it from the parchment paper. Remember to tell your dinner guests to remove the sprigs of thyme and oregano.

Serve with brown rice or a Greek salad.

DSC_6907

IMG_8435

IMG_8443


Garlicky Roasted Vegetable Pasta with Pesto

Leftover roasted vegetables are great ingredients to have in the refrigerator when you need to cook a fast and healthy weeknight meal. I had extra roasted zucchini and bell peppers left over after making my Vegetable Lasagna. The day after I made the lasagna, I used some of the roasted vegetables as a topping for homemade pizza. A couple days later, I used the remaining roasted vegetables in this Garlicky Roasted Vegetable Pasta with Pesto. The basil pesto used in this recipe can also be made in advance and stored frozen up to 3 months. I am not ashamed to admit that I used store bought basil pesto; in addition, I used store bought garlic paste since I like my pesto garlicky. This healthy and delicious dinner was ready in 20 minutes.

Serving size: 2

Ingredients for Basil Pesto:

  • 2 cups packed fresh basil leaves
  • 3-4 cloves garlic (I like mine garlicky)
  • 1/4 cup pine nuts
  • 1/2 cup extra-virgin olive oil, divided
  • 1/2 cup grated Parmigiano-Reggiano cheese
  • Kosher salt and freshly ground black pepper, to taste

Ingredients for Pasta:

  • 2 cups of cooked pasta (use your favorite pasta; gluten-free if you pefer; I used whole wheat)
  • 1/4 teaspoon garlic paste (optional and used only because the store bought pesto was not garlicky enough)
  • pinch of red chili flakes
  • 1/4 cup roasted bell peppers, sliced*
  • 1/2 cup roasted zucchini slices*
  • 1 cup miniature heirloom tomatoes, sliced
  • 3 tablespoons basil pesto
  • 2 tablespoons of freshly grated Parmigiano-Reggiano cheese

* Note: For directions on how to roast bell peppers and zucchini, follow the instructions on the Vegetable Lasagna recipe.

Directions:

In a food processor, pulse basil, garlic and pine nuts a few times until just combined. Then, while the food processor is running, slowly drizzle in olive oil. It’s important to do this slowly to ensure it will emulsify. Season to taste with salt and black pepper. If you are using the pesto immediately, stir in the cheese. Otherwise, store and freeze without the cheese. You can add freshly grated cheese once you are ready to thaw out and use the pesto.

Cook pasta in salted water and drain. Add the pasta back to the same pot. On medium heat, add the garlic paste, red chili pepper flakes, roasted peppers, roasted zucchini and tomatoes. Stir together and heat until vegetables are warmed through. Combine pesto and heat for 2 additional minutes. Just before serving, sprinkle freshly grated Parmigiano-Reggiano cheese.

DSC_6710

Left over roasted zucchini and bell peppers were also used  to make pizza.
Left over roasted zucchini and bell peppers were also used to make pizza.