Vegetable Quinoa Egg Bites

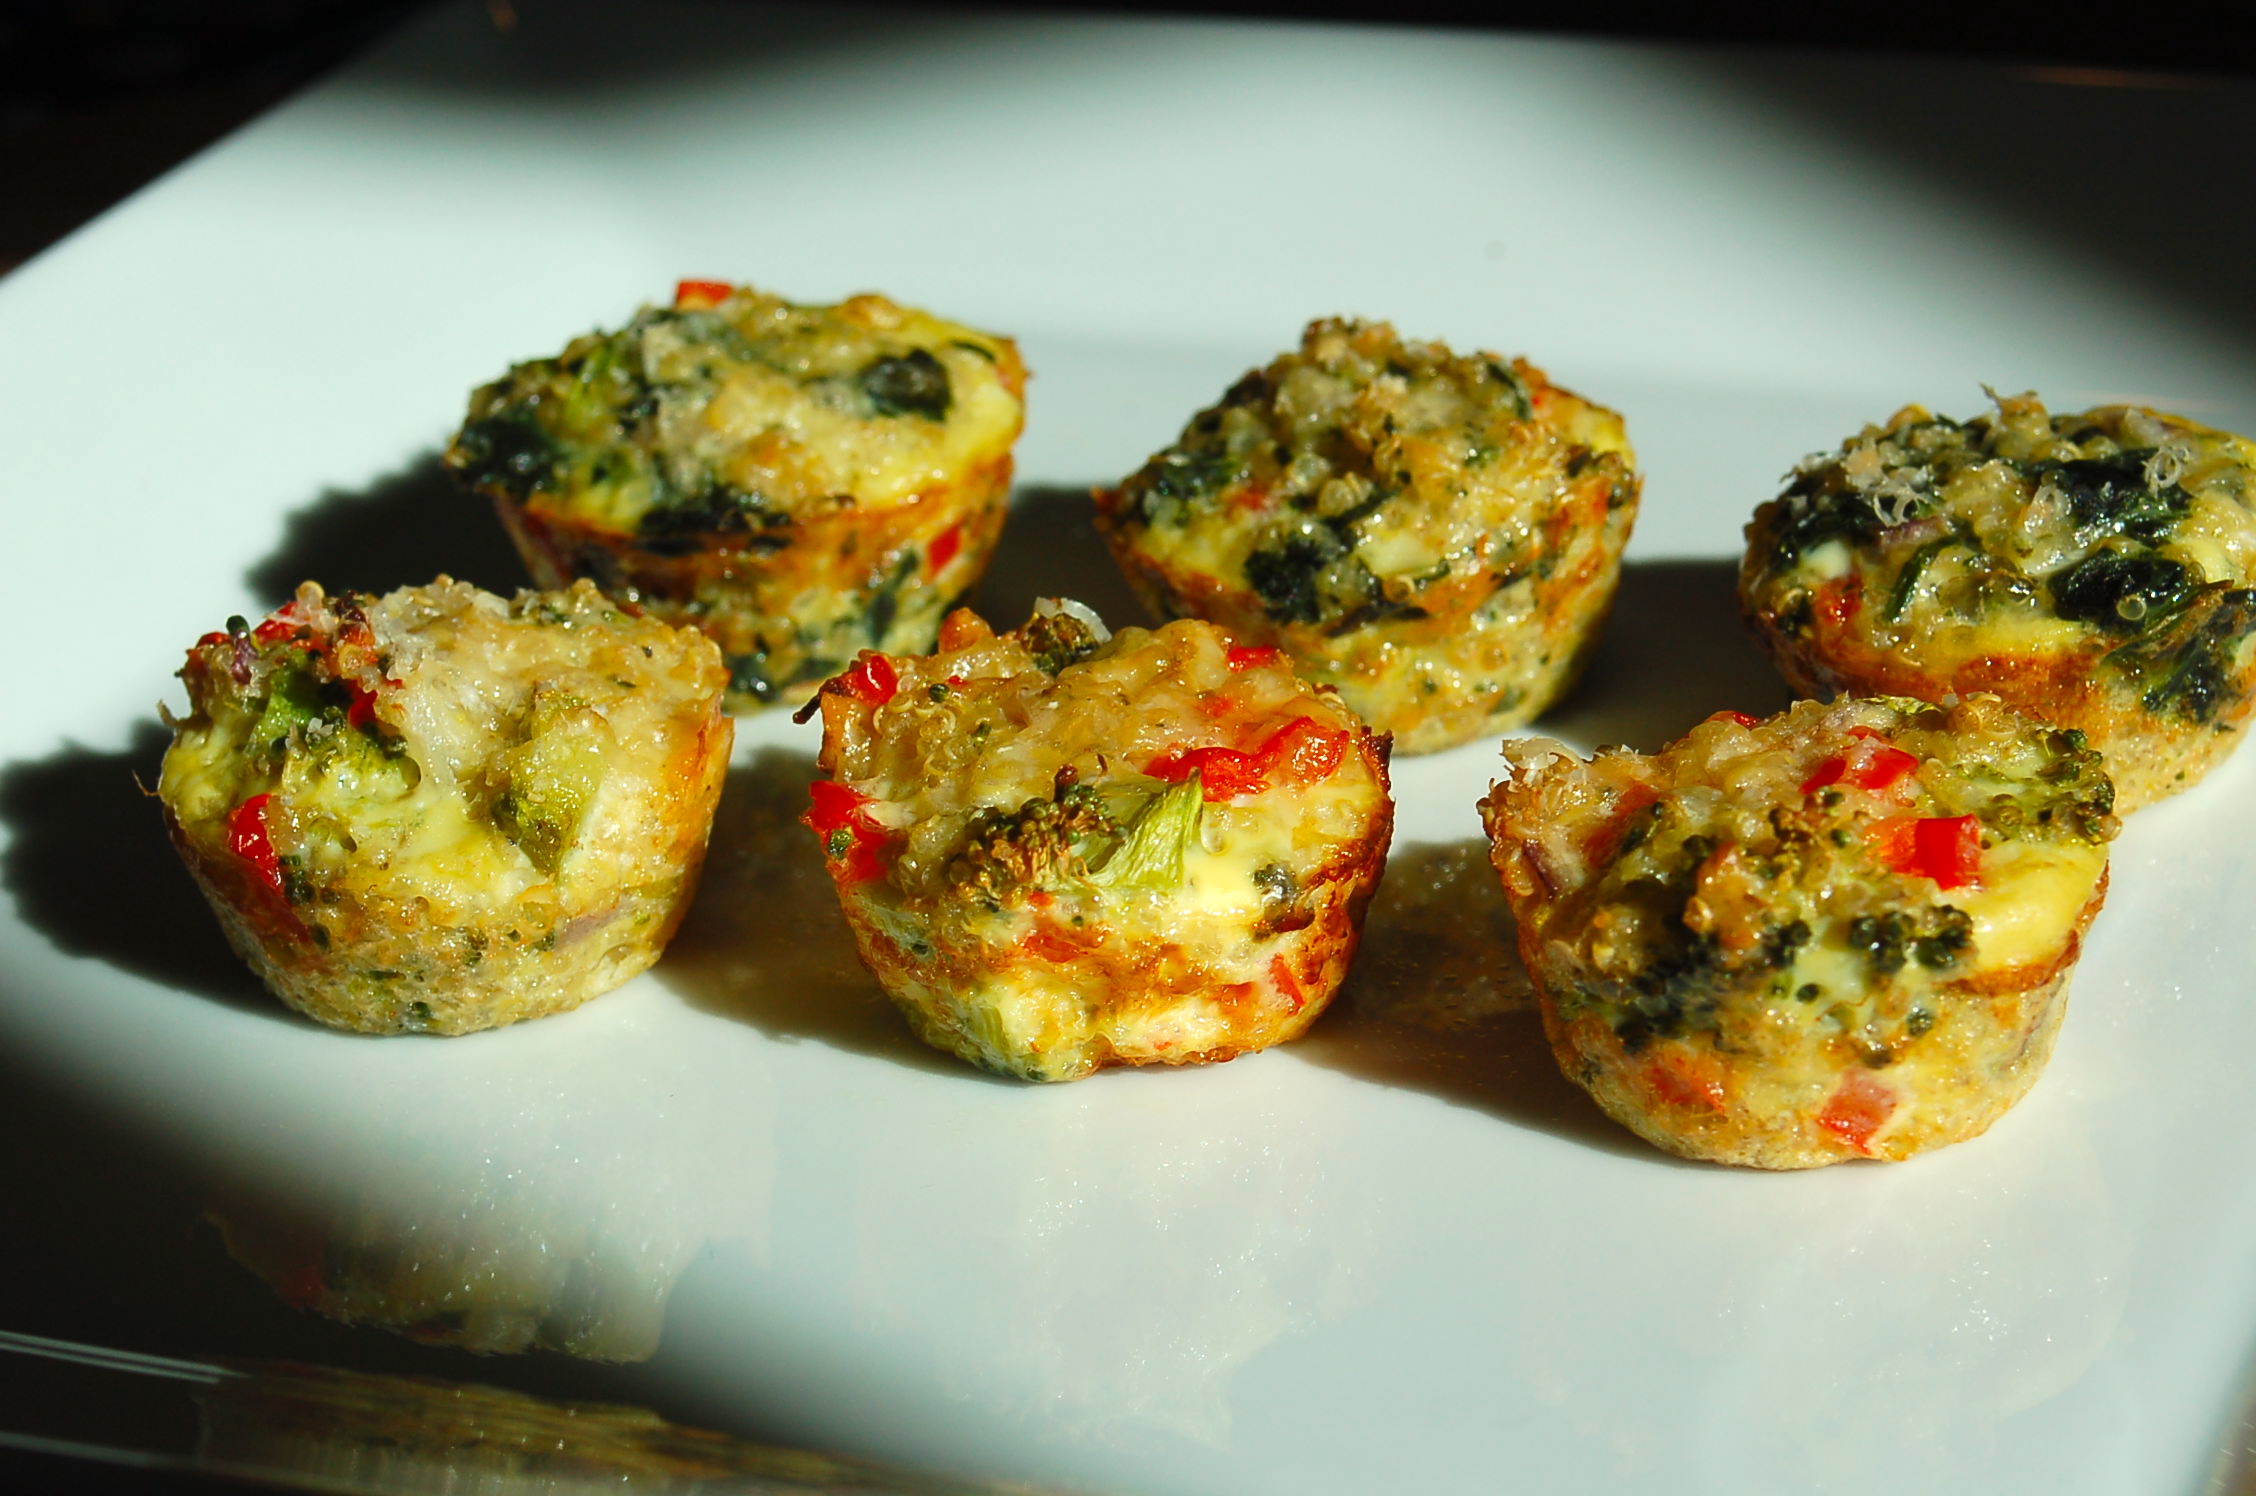
Vegetable Quinoa Egg Bites are one of my favorite fast and healthy recipes for breakfast. Make them the night before then pop them in the microwave or toast them in the oven in the morning for a nutritious breakfast on the go. Throw a few in a plastic bag and you’ll have a yummy post morning workout snack on the way to work. Merry Brandybuck and Hungry Athletes alike might also enjoy this as a second breakfast.

Resembling a mini quiche, they can be filled with your favorite vegetables. I like to fill mine with a combination of either spinach and red peppers or broccoli and red peppers. Cayenne pepper and nutmeg adds a nice flavor but be careful, a little of both goes a long way. I also recommend using freshly grated nutmeg. Nutmeg seeds last up to four years longer than powdered nutmeg.

Did you know that nutmeg and mace come from the same tree? Nutmeg is the seed while mace is the covering or aril of the seed.  Here’s some more interesting tidbits about nutmeg: http://www.drweil.com/drw/u/ART03474/Cooking-With-Spices-Nutmeg.html

Serving size: 16 mini muffins
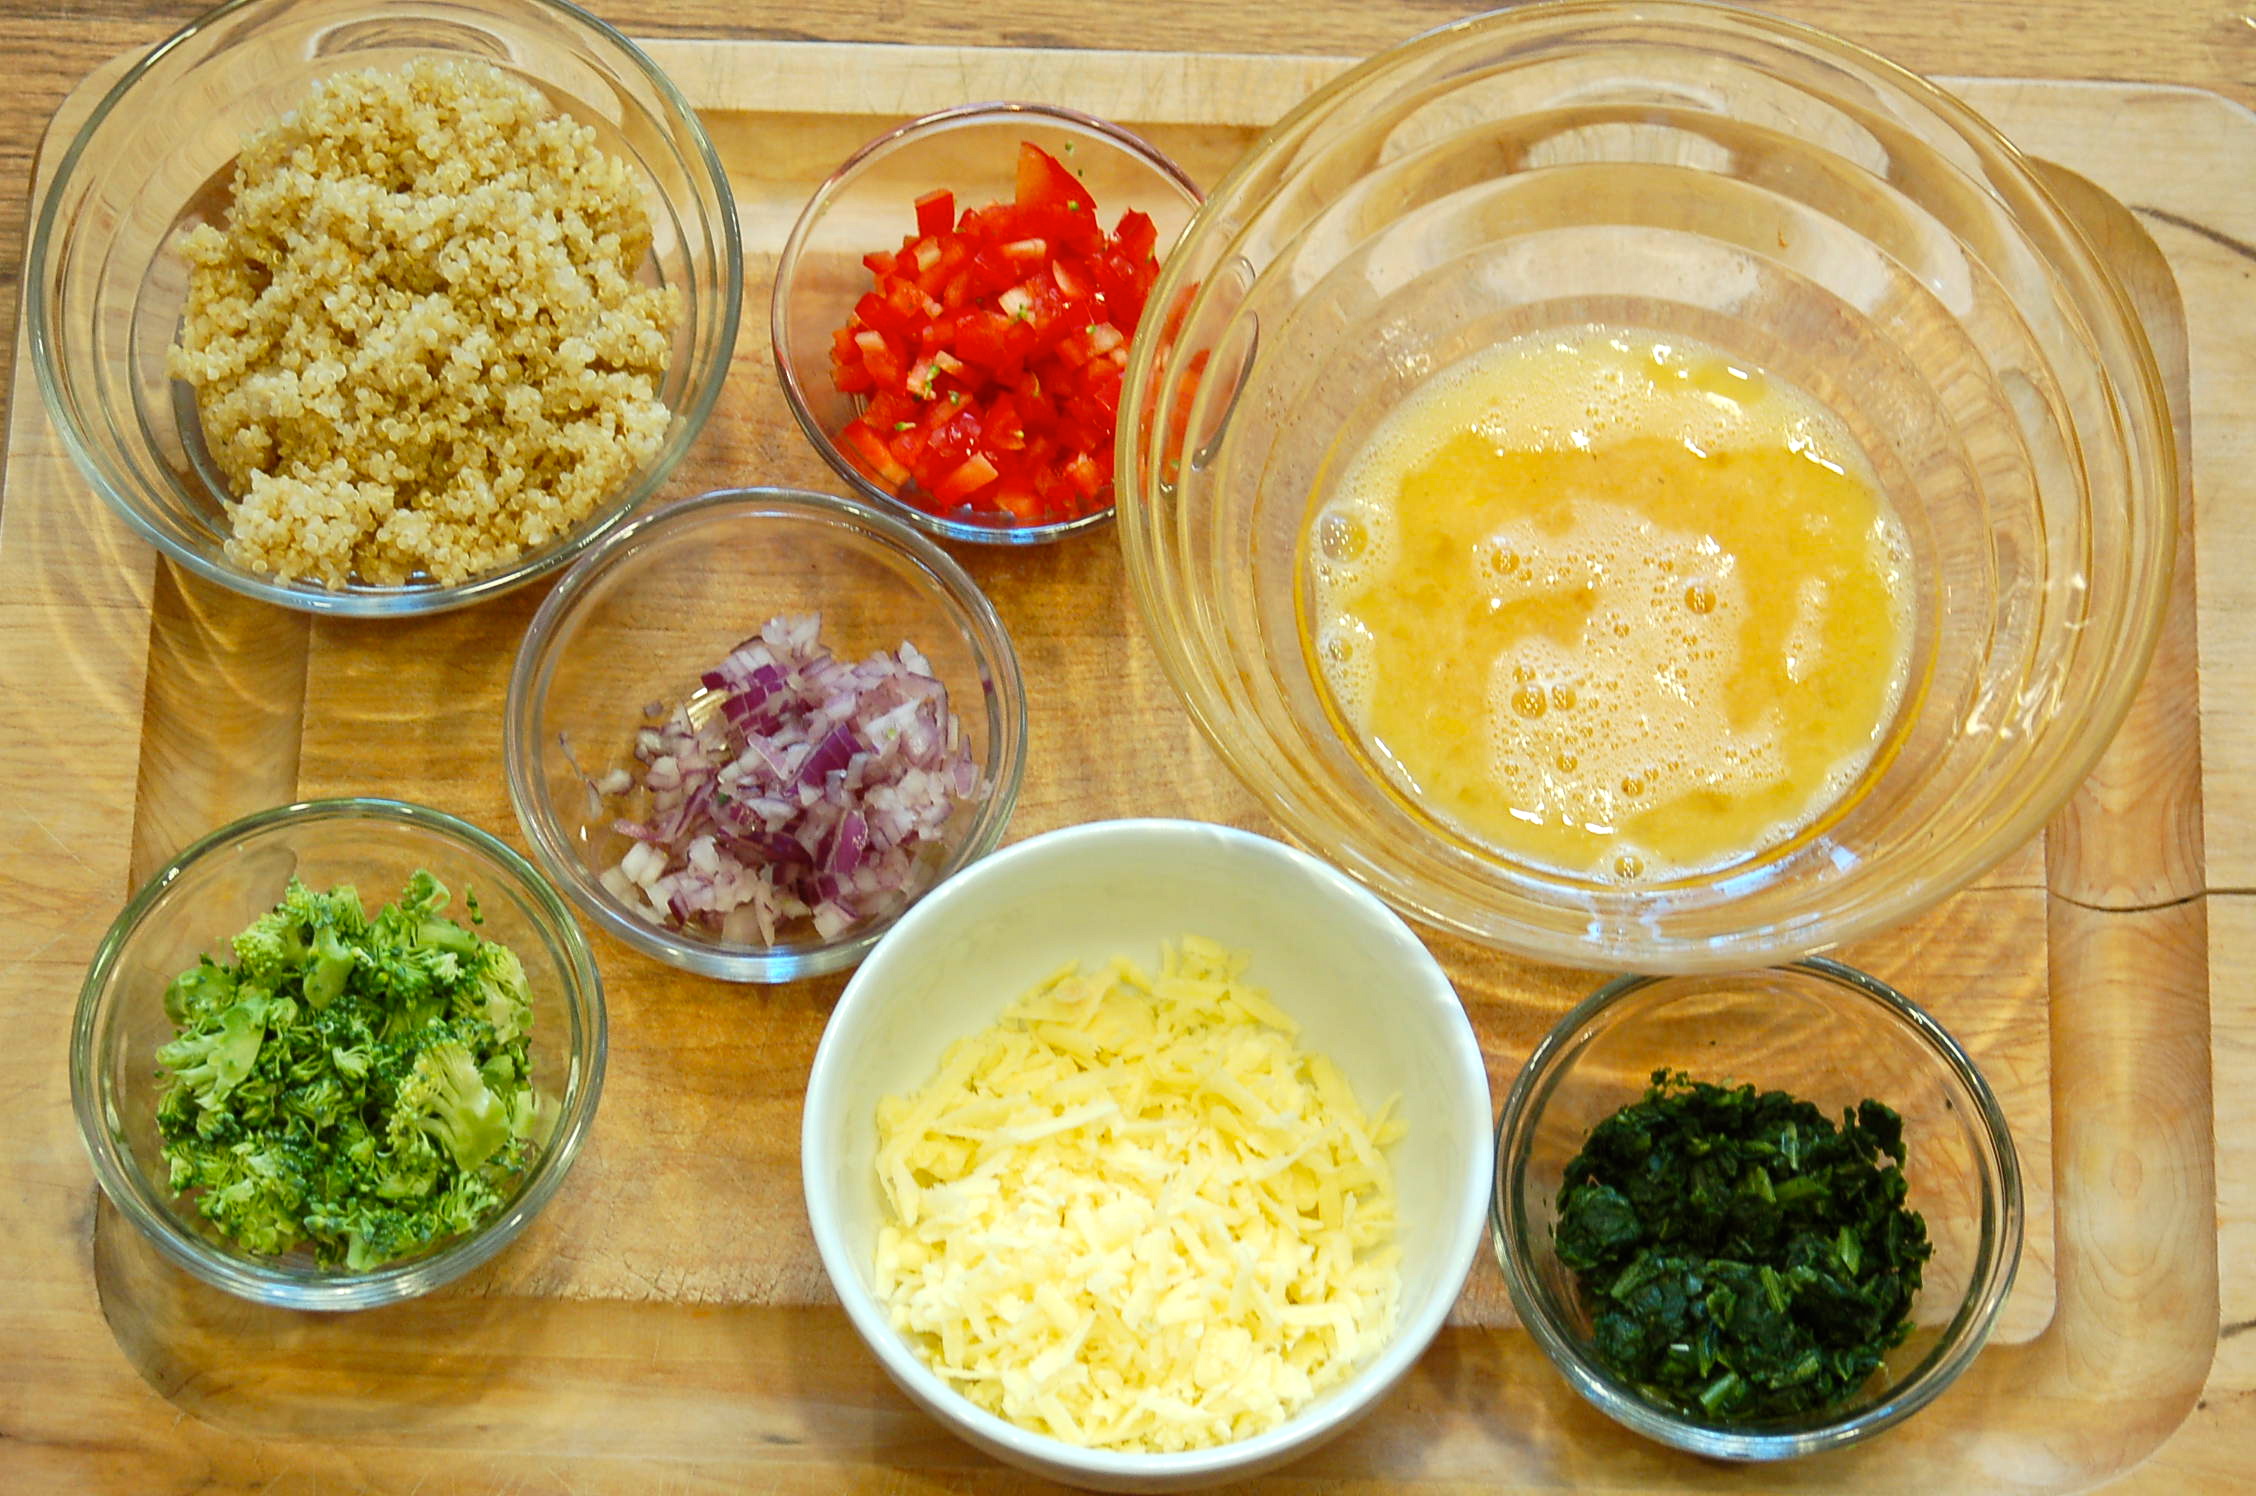
Ingredients:

  • 1 cup cooked quinoa
  • 2 eggs + 1 egg white
  • 1/4 teaspoon Kosher salt
  • 1/4 teaspoon cayenne pepper
  • 1/4 teaspoon grated nutmeg
  • 1/2 cup of chopped broccoli or 1/2 cup of frozen spinach, defrosted
  • 1/2 cup diced red pepper
  • 1/4 cup finely diced red onion
  • 1 cup shredded cheddar cheese
  • 3 tablespoons grated Parmesan cheese
  • canola or vegetable oil to brush muffin pan

Directions:

Preheat oven to 350F.

Cook quinoa according to the package instructions. Make sure you rinse the quinoa thoroughly if the package indicates it has not been previously rinsed. Rinsing will remove the quinoa’s natural coating called saponin, which can have a bitter or soapy flavor.

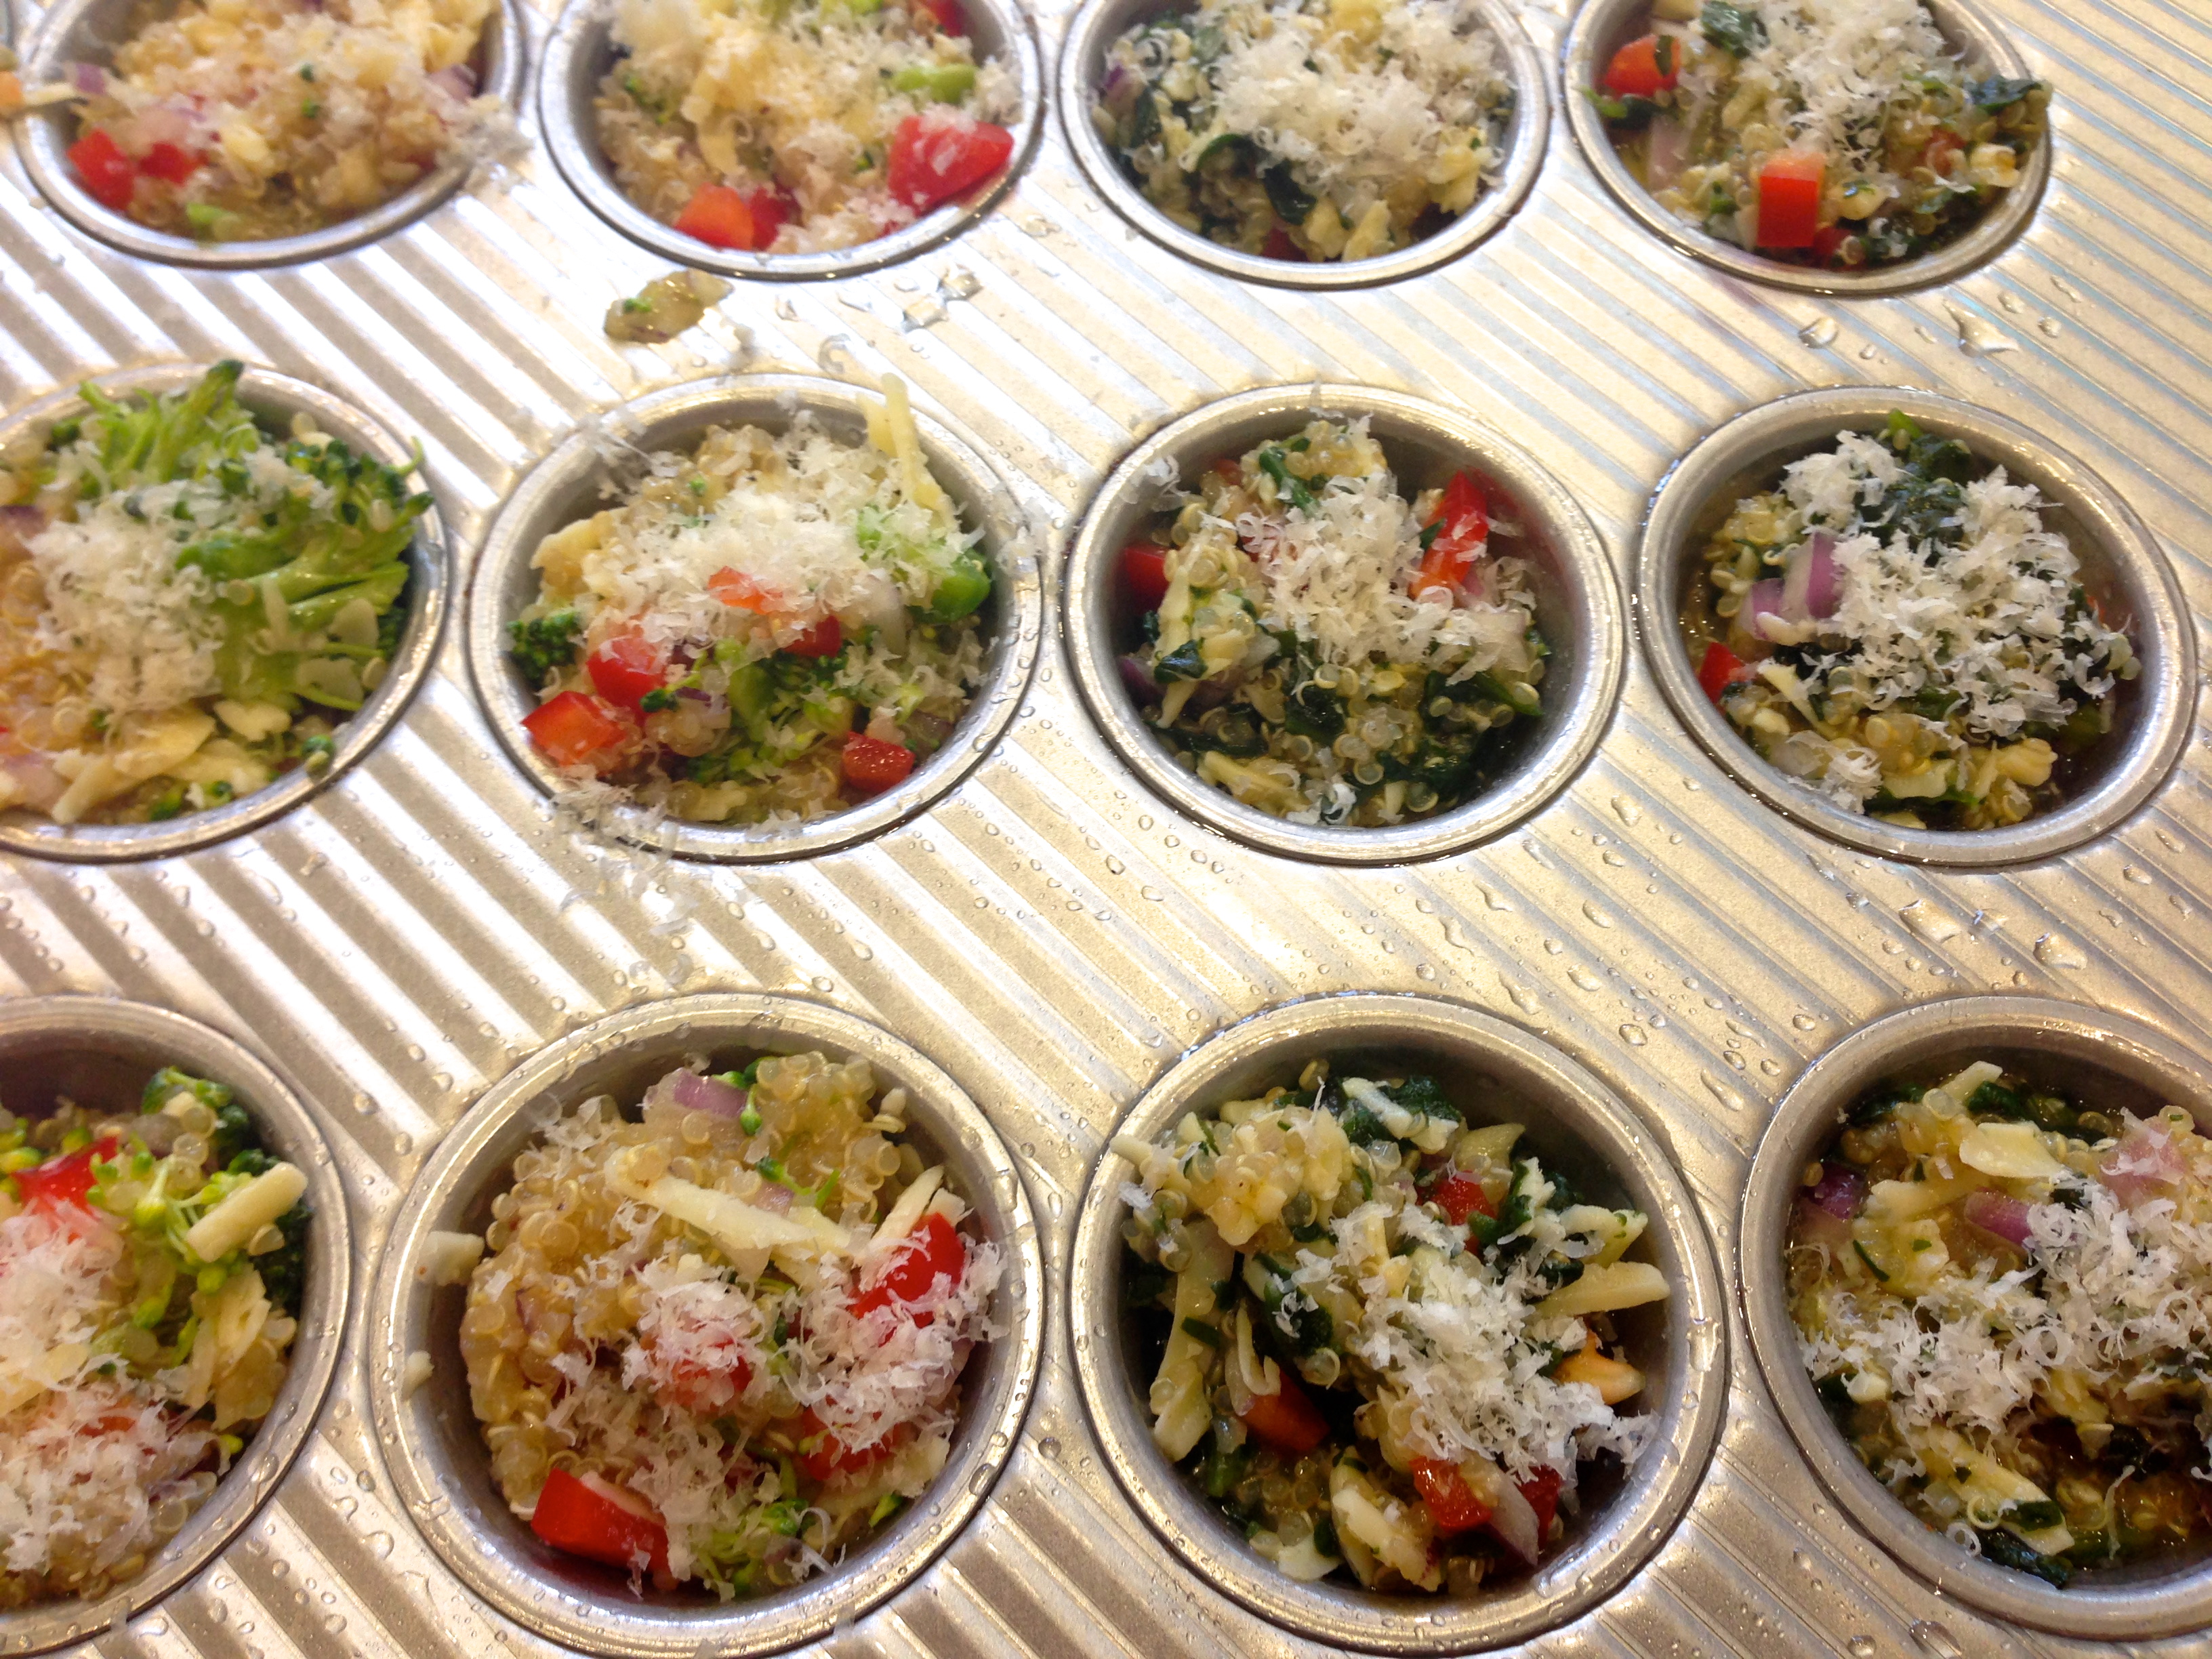
Whisk together the eggs, salt, cayenne pepper and nutmeg. Then mix in the quinoa, vegetables and cheddar cheese.

Brush the inside and top of a mini muffin pan liberally with oil. Fill the muffin pan all the way to the top will the quinoa and egg mixture. Sprinkle with finely grated Parmesan cheese. Bake for 25 minutes or until the edges are golden brown.

DSC_6927

IMG_8450

DSC_6934

Valentine’s Day Hungry Athlete Style

Ah Valentine’s Day … the most grandiose of Hallmark holidays. While I don’t need Hallmark to tell me when to be romantic, it’s still a good excuse to flirt and eat chocolate.

How will this Hungry Athlete celebrate Valentine’s Day? Well, by supporting her boy, Rama at his first 100K trail race of course! Around the same time many couples will be gazing at each other over a romantic dinner, Rama and I will be scantily clad and engaging in a sweaty one on one moment. I’ll be pacing him, I mean chasing him, for about 10 miles, to the finish line. While this day will be all about Rama, it will still be a romantic treat for me to be able to support him and see him at the finish line.

Back to the flirting and chocolates. Although Rama will need to stick to a race day diet, I will have a few surprises up my sleeves.

Ta da! Here are the fun treats I’ll have waiting for him at the aid stations.  I made the tags myself but found templates for the tags here:

http://www.skiptomylou.org/wp-content/uploads/2009/08/fruitlabels.pdf

DSC_6872

But unless you are spending February 14th at an ultramarathon, you are probably looking for something a little more exciting to give to your Valentine.

Here are some decadent but healthy treats that your Valentine will find extra sweet because it’s hand made by you. These Dark Chocolate Covered Fruits and Nuts are so easy to make and are a better alternative to those sugary candy conversation hearts.

Ingredients:

Use your favorite fresh or dried fruits and roasted nuts. I like to sprinkle a little flake salt on top of the chocolate before it hardens. Here are some of my favorites:

  • Dried banana chips
  • Strawberries
  • Blueberries
  • Pomegranate arils (seeds)
  • Clementine
  • Assorted roasted nuts
  • Dried fruit (cranberries and apricots)
  • Chocolate chips (I prefer dark chocolate 60-70% cacao)
  • Flake salt

Directions:

Melt the chocolate chips over a bowl set over bowling water or in a microwave. I dipped the fruit in the chocolate and placed them on parchment paper. Refrigerate for 3-5 minutes to harden.

DSC_6877

If it weren’t for his race, we’d probably be at home making Valentine’s Day dinner together. Here are some ideas for a Valentine’s dinner at home.

Appetizer/Salad:

Beet and Watermelon Salad

Orange, Fennel and Arugula Salad

Main Course:

Beouf Bourgignon

Acorn Squash Stuffed with Curry Mustard Quinoa, Butternut Squash, Spinach, Cranberries and Toasted Almonds

Dessert:

Chocolate Cinnamon Mousse

Frozen Strawberry Lemon Yogurt

Spicy Dark Chocolate, Pretzel & Caramel Surprise Cookie (aka “The Ultimate Tailgating Cookie”)

Warning.  These adult cookies are a bit naughty.  These not-so-kid-friendly treats have a spicy afternote, deep dark chocolate richness, salty crunch and sweet surprise that prefer to be chased by a cold beer over a glass of milk.

The decadent cookies were inspired by Sports Illustrated writer, Peter Bukowski, who had me thinking, what cookie would pair well with beer at a football tailgate?  I immediately enlisted Tracy, one of my best childhood pals, cookie queen and fellow Ironman triathlete, to help create the cookie.  Not only is Tracy a great cook; she also enjoys beer. While most of my recipes are healthy, this Hungry Athlete believes that it’s ok to indulge a little, every now and then.  I’ll be serving these cookies to a bunch of ultra runners this Super Bowl Sunday.  They’ll be burning a lot of calories prior to the game, so let’s indulge.

NOTE:  The caramel candy filling is optional.  I love caramel however I personally can only eat one of anything caramel.  To satisfy those who love to gobble up lots of caramel, I fill only half the batch with the Dove caramels.  For the best results, place the Dove caramels in the freezer for at least 30 minutes.  Plain caramel candies hardened up too much at room temperature.

Serving size: 16-18 cookies

  • 1/2 cup plus 2 tablespoons of unsalted butter
  • 1/4 cup plus 2 tablespoons unsweetened dark cocoa powder
  • 1/4 teaspoon cayenne pepper
  • 1 teaspoon instant espresso
  • 1 large egg
  • 1/3 cup ultrafine or superfine baking sugar
  • 1/2 cup dark brown sugar
  • 1 teaspoon vanilla extract
  • 1 cup all purpose flour
  • 1/2 teaspoon baking soda
  • 1/2 teaspoon Kosher salt
  • 3/4 cup thick medium sized pretzels (I used Snyder Old Thyme), rough chopped to the size of two chocolate chips
  • 1 teaspoon vanilla extract
  • 3/4 cup semi sweet chocolate chips
  • 1 package Dove caramel candies (optional), placed in freezer for 30 min

Directions:

Preheat the oven to 350F and place the Dove chocolates in the freezer for about 30 minutes.

In a saucepan over low to medium heat, melt the butter.  Whisk in cocoa until smooth, then whisk in instant espresso and cayenne pepper.  Remove the saucepan from the heat and set it aside.

In a medium size bowl, sift the flour, baking soda and Kosher salt together.  Set it aside.

Using an electric mixer, on medium speed, with a whisk attachment, mix the egg and both sugars together.  Scrape the side of the bowl while mixing to ensure everything is well combined.  Add vanilla extract and continue mixing for another minute. Add the cocoa mixture and mix on medium speed until combined.  Then add the flour mixture and mix again until just combined.

With a spatula or wooden spoon, mix in chocolate chips and pretzel pieces by hand.  It might be easier to just use your fingers but don’t over mix.  There may be loose pieces of pretzels in the bowl.  You can redistribute those when forming the cookies.

Using your hands, shape the dough into 2 1/2 inch wide round cookies.  The dough will not spread much when baking. If you are incorporating caramel, wrap the dough around the caramel candy until it’s completely covered.  I try to cover up the pretzels so it’s a nice salty and crunchy surprise when biting into the cookie. It’s ok if some of the pretzel pieces are poking through. Place the formed cookie dough on a baking sheet lined with parchment paper and bake for 8-9 minutes.   Since you won’t be able to gauge the doneness of the cookies by observing how brown it is, I recommend test baking a couple cookies to determine the best baking time. Allow the cookies to cool slightly or completely.  Cookies will cool to a crisp on the outside and stay tender on the inside.  The caramel will remain soft at room temperature.

If you enjoy these cookies, stay tuned! Tracy and I are working on more cookies with beer.

Use the larger size pretzels and and rough chop about double the size of two chocolate chips.
On the left, with a caramel candy; on the right, without a caramel candy.

DSC_6832

J’Wow’s Salsa

I had the pleasure of training for my first Ironman with Jerrold, a good friend and triathlete known as J’Wow.  He’s like a little brother to me.  He’s rescued me when I was suffering from heat exhaustion during a long training ride and encouraged me to run with him when I was suffering from stomach pain during our first Ironman.  And like any little brother, he thoroughly enjoys annoying me with his teasing.

I joined J’Wow at Lake Tahoe this summer when he came up to train with his coach.  This is when I discovered J’Wow’s delicious fresh salsa.  Fresh salsa is a very healthy snack.  Tomatoes, onions,  jalapeños and lime juice contain vitamin C.  Jalapeños contain capsaicin, which generates heat, increases the heart rate when consumed and naturally raises the metabolic rate.  Avocados contain healthy fats, mostly oleic acid, which helps reduce bad cholesterol.  In addition, avocados contain protein, fiber and is an excellent source of potassium.  What a delicious way to consume raw and nutritious fruits and vegetables.

J’Wow prefers chips with a hint of lime flavor to serve with the salsa.  I’ve used the salsa with fish tacos, burritos and a variety of chips.  Although you can serve the salsa right away, it tastes even better the next day after all the flavors have had a chance to marry.  We had 6 people in the house and this recipe made enough salsa for us to enjoy for 2 days.

Serving size: 12

Ingredients:

  • 10 tomatoes on the vine diced
  • 1 large yellow onion diced
  • 1 green bell pepper diced
  • 3 ripe avocado diced
  • ¼ cup finely chopped cilantro
  • 2 – 2 1/2 jalapeño peppers, seeds removed and minced
  • ½ cup of lime juice (4 medium fresh limes)
  • Salt & pepper to taste

Directions:

In a large bowl, dice the tomatoes, onion, green bell pepper and avocado.  Add finely chopped cilantro and minced jalapeno peppers.  I removed the seeds and was careful to wash my hands well after handling the peppers.  Add more or less peppers depending on your taste and how hot the peppers are.

Add the lime juice. One fresh medium lime should yield about 2 teaspoon of juice.  If the limes are small or dry, you may need more than 4 limes to yield ½ cup.  To get the most juice out of a lime, I put pressure roll it on the cutting board while putting pressure on it with the palm of my hand. I then use a reamer.  You can also put it in the microwave for 20 seconds before squeezing.

Toss all of the ingredients together.  Add salt and pepper to taste.

IMG_6022

IMG_6004

IMG_6006

IMG_6018

Pear and Goat Cheese Pizza with Caramelized Onions

I am the social athlete.  I never turn down an opportunity to have a meal with my fellow athlete friends.  Last week I had the pleasure of dining with 4 other fellow female Ironman triathletes, two were racing a 50K marathon in the next 48 hours and I was racing a half marathon in the next 72 hours.  Our carbo-loading meal was a fabulous Pear and Goat Cheese Pizza.  It was so good, I was still thinking about it this week and decided to make it.

Since I’m the busy every day athlete, with competing fulltime responsibilities like everyone else, I take cooking shortcuts every chance I get.  The big time saver for this recipe is buying the pizza dough.  These days you can find a variety of pizza dough in your local supermarket’s freezer.  I decided to buy whole wheat dough, but you can also use multi-grain or traditional pizza dough.

Here’s nutritional information for whole wheat pizza dough:

http://healthyeating.sfgate.com/nutrients-whole-wheat-pizza-dough-3626.html

NOTE:  I originally made candied walnuts to add to the pizza (in the photos), however the caramelized onions added enough sweetness.  I ended up picking the walnuts off and enjoying them separately.  Next time, I’ll use plain toasted walnuts for some crunch without the added sugar.  Nuts, including almonds, walnuts, and pecans, have been shown to have heart healthy benefits, including lowering “bad” LDL cholesterol.  Walnuts are also a source of omega-3.

Ingredients:

  • pizza dough*
  • 1 cup of thinly sliced onion
  • ¼ cup olive oil
  • Kosher salt
  • freshly cracked peppercorns
  • corn meal
  • 6 ounces of crumbled goat cheese*
  • juice of 1/2 lemon
  • 2 ripe pears, thinly sliced (depending on the size of the pear, you may only need 1 1/2)
  • arugula
  • 1/3 cup toasted walnuts (optional)

* NOTE: If you are a gluten-free diet, ensure that the ingredients you are using are gluten-free.

Directions:

Preheat over to 450F.

Follow the instructions for the pizza dough.  Usually the dough, if frozen, will need to  defrost over several hours and then allowed to sit a few more hours in a bowl, greased with olive oil, until the dough doubles in size.

DSC_6166

Cook onions covered in pan over medium/low heat with 2 tablespoons of olive oil and a pinch of salt and pepper.  Cook for about 15 minutes until soft and caramelized.  You may need to remove the lid to allow all of the liquid to evaporate towards the end of the cooking time.  Allow to cool.

The caramelized onions will be very sweet so a little bit added to the pizza will go a long way.

Prepare pizza dough and place on pizza stone or baking pan dusted with corn meal.  Bake pizza dough for about 10 minutes.  Remove from oven and top pizza with goat cheese and bake for 10 additional minutes or until cheese is starting to melt.

Whisk together remaining 2 tablespoons of olive oil, juice of 1/2 lemon and salt.  Toss arugula and in olive oil and lemon dressing.

Remove pizza from oven and top with pears, caramelized onions and arugula.  Season with freshly cracked pepper.  For some extra crunch, top with some plain toasted walnuts.

DSC_6181


IMG_0618

Spicy Roasted Chickpeas

Chickpeas or garbanzo beans are a good source of protein and fiber.  Roasting the chickpeas and tossing them in spices and honey transforms them into tasty, crunchy and healthy snacks.  They key is to bake them long enough to get a nice crunch without burning the honey coating.  If you prepare them without honey, you can bake them at a higher temperature (400F – 425F).  I prefer the salty, sweet and spicy combination and found that if you bake them “naked” for 30 minutes, then lower the temperature, you can achieve crunchy texture without burning the chickpeas.  There are many possible spice combinations.   Here are 2 recipes:

Preheat oven to 375F

Spicy Cumin & Paprika

  • 2 – 15 ounce cooked garbanzo beans (chickpeas) rinsed and dried
  • 2 teaspoons olive oil
  • 2 tablespoons honey
  • 1 tablespoons Worcestershire sauce
  • 1 teaspoon kosher salt
  • ½ teaspoon cayenne powder
  • ½ teaspoon paprika
  • ½ teaspoon cumin

Sweet & Spicy Rosemary

  • 2 – 15 ounce cooked garbanzo beans (chick peas) rinsed and dried
  • 2 teaspoons olive oil
  • 3 tablespoons honey
  • 1 1/2 teaspoon kosher salt
  • 1 tablespoon finely chopped fresh rosemary
  • ½ teaspoon cayenne powder

Rinse and drain chickpeas and spread on paper towels.  Remove any loose skin.  With another paper towel, pat to dry and air dry for 1 additional hour.  Chickpeas should be dry before baking.

DSC_6054

Line baking sheet with aluminum foil and bake chickpeas for 30 minutes, turning after 15 minutes.

DSC_6070

In medium mixing bowl, mix all remaining ingredients.

DSC_6074

Add hot chickpeas to bowl and coat evenly. Lower the oven temperature to 325F.  Return chickpeas to aluminum lined baking sheet and bake for additional 60 minutes, turning every 15 minutes.  The chickpeas are done when they are firm and crunchy which may require more or less baking time.  Allow to cool and enjoy.

DSC_6077

Kale Chips

Salted kale chips make a healthy and satisfying alternative to potato chips. I was introduced to kale chips at a water stop during “America’s Most Beautiful Bike Ride” in Lake Tahoe this year.  I was near the end of my 72 mile ride and craving salt.  A wonderful volunteer kindly shared his dehydrated salted kale chips.  They were so good I went back for 3 more helpings!  So I attempted to make them at home. I didn’t have a dehydrator so I tried crisping the kale up in the oven.  I ended up with these delicate and crispy treats!  I have a cramping issue so I am trying to take in a little more salt prior to my races or longer rides.

For more nutritional information on kale, check out this article:

http://www.webmd.com/food-recipes/features/the-truth-about-kale

Ingredients:

  • 1 head of Kale (I used Dinosaur Kale in the photo)
  • 1 tablespoon olive oil
  • Kosher/sea salt

Directions:

Preheat oven to 250F.

Separate kale leaves, rinse and dry thoroughly with a paper towel.  I recommend you leave the kale spread out in a single layer on paper towels to air dry even after you pat it dry.  Remove the ribs and cut the kale leaves into thirds.  The leaves will shrink when baked.  Toss in enough olive oil to lightly coat the leaves, about one tablespoon.  Use your hands to gently massage the oil onto the leaves.  Sprinkled with salt.  Place in single layer on a baking sheet and bake for about 15 minutes in the oven at 250F.  Using your fingers, gently flip over the leaves and continue to bake for another 15 minutes.  It shouldn’t be too hot to handle and you will be rewarded for the gentle loving touch with delicate, crispy kale.

Store in an airtight container to retain the crispness, however you won’t need to store them for long.  They are a salty addiction and will be gobbled up quickly.